EMU is professional lighting-control software from ENTTEC. Pre-program your show on your laptop, then trigger it live, manually, in time with audio, from a controller, or from your via the EMU plug-in.
Installation & licensing
Everything you need to get EMU running on your machine: system requirements, the install flow on Windows and macOS, what happens on first launch, how licensing works, how to keep EMU up to date, and how to migrate shows from older versions.
System requirements
| Component | Mac | PC |
|---|---|---|
| Operating system | macOS 14 "Sonoma" or later (Intel or Apple Silicon); macOS 15 "Sequoia" recommended | Windows 10 / 11 (64-bit); Windows 11 recommended |
| Processor | Apple Silicon (M1 or newer) or Intel x64 | Quad-core 2 GHz or better |
| RAM | 8 GB minimum, 16 GB recommended | 8 GB minimum, 16 GB recommended |
| Disk space | 500 MB for EMU + room for shows | 500 MB for EMU + room for shows |
| Graphics | 4 GB VRAM or better, integrated GPU is fine for small rigs | 4 GB VRAM or better, integrated GPU is fine for small rigs |
| Network | Ethernet (or Wi-Fi) for Art-Net output and license validation | Ethernet (or Wi-Fi) for Art-Net output and license validation |
How much horsepower you actually need depends on what you're doing. A small show with a handful of fixtures runs comfortably on a base-spec laptop. Driving 32 universes of Art-Net with multiple Oscillators, the Sound Tracker, the LED Mapping engine, and a VST3 plug-in benefits from extra cores, more RAM, and a discrete GPU.
Installing EMU
EMU ships as a free download from the ENTTEC website. The same installer covers both the free tier and the paid tiers, your license unlocks the paid features after install.
Download
- Open the EMU product page on enttec.com.
- Click Download and pick the installer for your operating system, Windows or macOS.
- Wait for the download to finish. The file is around 100 MB.
Install on Windows
Double-click the downloaded EMU-Setup.exe. EMU installs itself in a few seconds, a small progress dialog appears, then closes, and the app launches automatically. There's no setup wizard, install-location prompt, or OS restart: EMU installs per-user (into %LocalAppData%) and keeps itself up to date from inside the app.
If Windows SmartScreen shows a "Windows protected your PC" warning, click More info then Run anyway, the installer is signed by ENTTEC.
Install on macOS
Open the downloaded EMU installer and follow the macOS prompts. EMU installs into your Applications folder and launches automatically, then keeps itself up to date from inside the app (no manual drag-to-Applications step).
If you plan to use the VST3 plug-in
The VST3 plug-in is installed alongside EMU. It lets you drive EMU programs from automation in your DAW. The installer places the plug-in in the standard VST3 folder:
| Platform | VST3 install location |
|---|---|
| Windows | C:\Program Files\Common Files\VST3\ |
| macOS | /Library/Audio/Plug-Ins/VST3/ |
Your DAW will pick the plug-in up automatically the next time it scans its plug-in folders. Full VST3 walkthrough in the VST3 plug-in.
Licensing
Free vs paid
EMU runs in Free mode out of the box. The free tier includes 1 DMX universe, the Sound Tracker, Art-Net output, GDTF import, and the custom-fixture editor, capped at one universe.
To unlock the full app, multiple universes, the LED Mapping engine, the VST3 plug-in, MIDI mapping, etc., buy a perpetual license:
$100 once
Pay once, own EMU immediately, with 1 year of updates included.
$10 / month × 12
Full features from the first payment. After 12 months the perpetual license is yours forever.
Activating a license
Settings › Account
- Open Settings › Account.
- If you're on Free tier, click Activate license.
- Enter email + password (and optionally voucher code).
- Press OK.
Changing the license on this machine
- Open Settings › Account.
- Click Change license.
- Enter the new credentials and press OK.
Deactivating a license
A single EMU license can be active on up to two computers at once. To move it to a new machine, deactivate it on the old one first.
- Open Settings › Account on the machine you want to deactivate.
- Click Deactivate.
- Confirm when prompted.
The license stays on your account and can be activated on another machine immediately.
If license activation fails
- "Could not reach the license server", check internet. Try a different network (mobile hotspot is a good test).
- "Invalid credentials", confirm the email matches your ENTTEC account. Reset password at enttec.com if unsure.
- "License limit reached", your license is already on two computers. Deactivate one or contact support.
- Voucher code rejected, re-paste carefully; format is
VEMU-XXXX-XXXX-XXXX-XXXX-XXXX.
Software updates
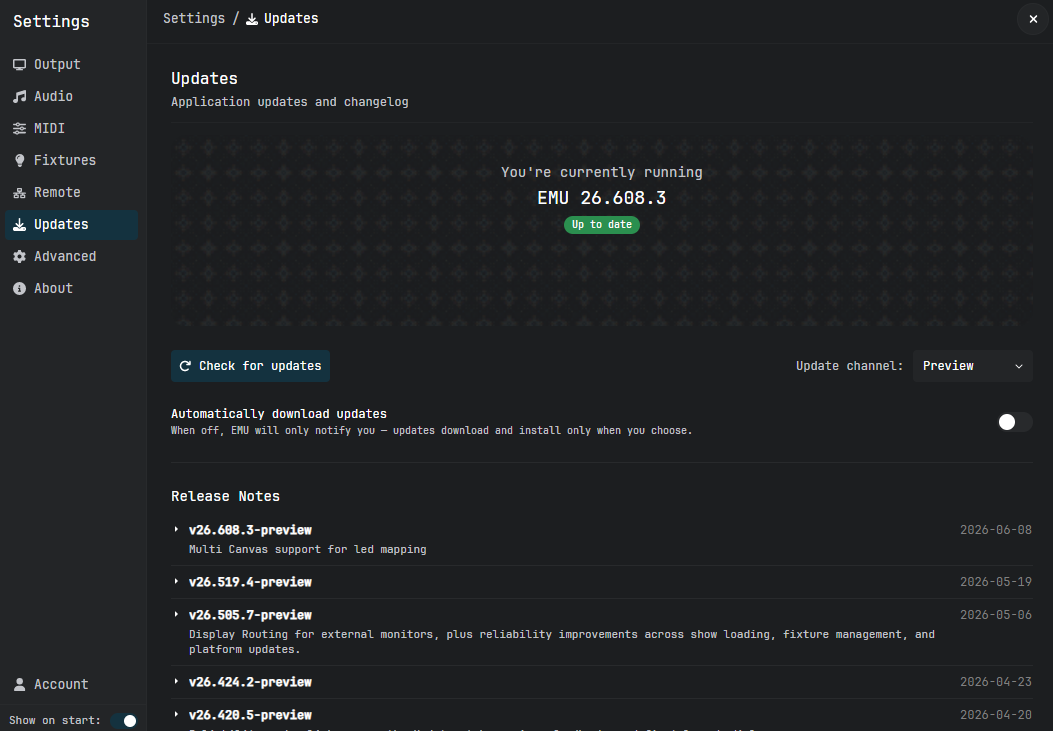
Settings › Updates
EMU updates itself in place, no need to download a new installer for every release.
Checking and downloading
The Updates tab shows your current version with a status pill: Updated Checking… Update ready
- Click Check for available updates to force a check (EMU also checks in the background).
- When an update is ready, click Download.
- When the download finishes, click Restart & Update whenever you're ready.
Automatic vs manual downloads
The Automatically download updates toggle lives in Settings › Updates.
- Toggle OFF (default): EMU only notifies you, you click Download to fetch. Useful on metered connections.
- Toggle ON: EMU downloads new updates automatically; you click Restart & Update when ready.
Release notes
Underneath the toolbar is the full version history. Click the arrow on any entry to expand it into three colour-coded sections: New Features (blue), Improvements (grey), Bug Fixes (dark).
Migrating from older versions
If you're installing on a machine with shows from an older EMU (especially the long-standing EMU 2.x line), EMU offers to back up your shows before opening them.
- Click Yes to make a safety copy of your shows folder.
- When the backup completes, EMU continues launching normally.
- If you'd rather skip the backup, click Close (X).
Help & support
EMU forum
The community forum at support.enttec.com is where most user questions get answered. Search before posting, your question has probably been answered already.
In-app feedback
The Feedback button in the top right of the main window opens a dialog where you describe the issue and EMU attaches a screenshot automatically.
What to include in every report
- Your OS and version
- Your EMU build number, find it in Settings › About
- Your EMU log file, Settings › Advanced › Open logs folder
- Clear description: what you did, what happened, what you expected
- A screenshot of the problem, the Feedback dialog captures one automatically
Main page
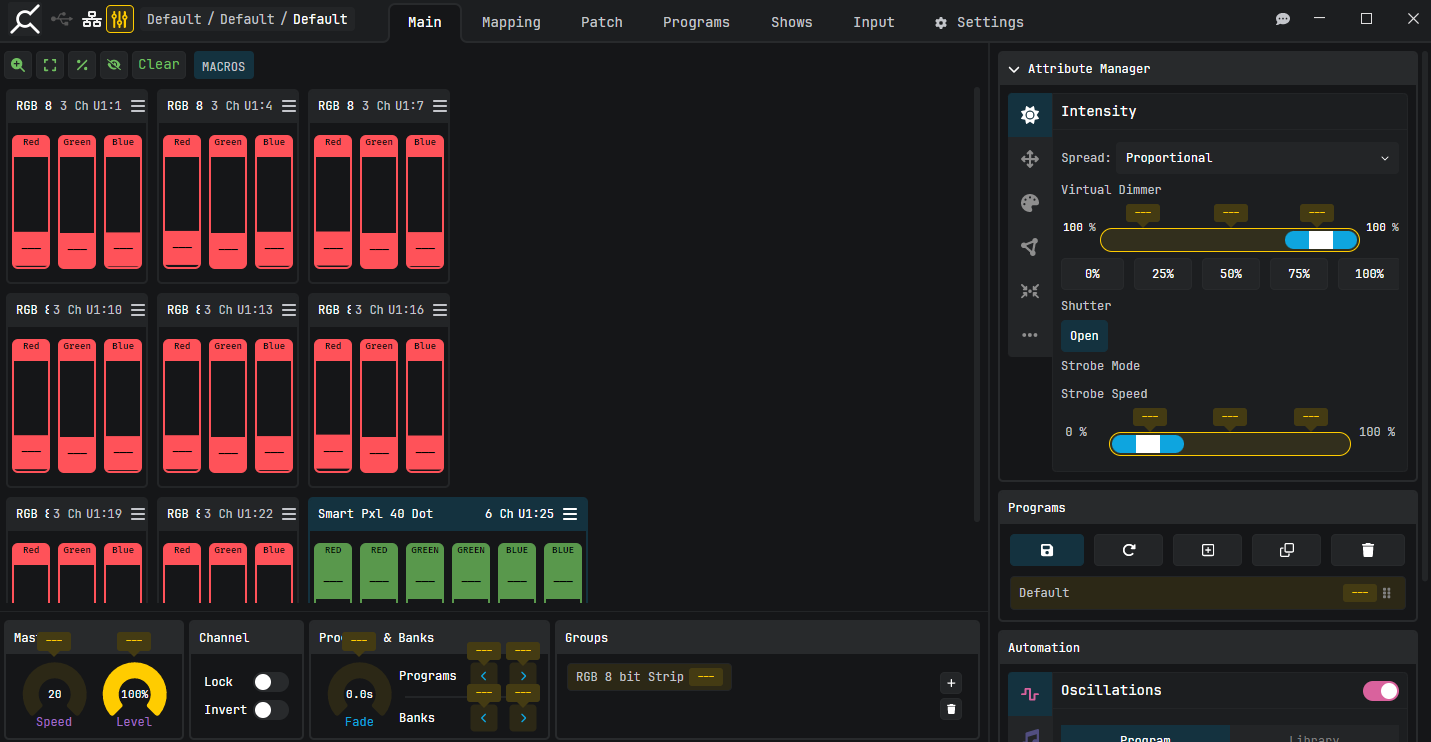
The Main page is the heart of EMU. It's a row of vertical faders, one column per patched fixture, surrounded by widgets that affect what those faders do.
Anatomy of the Main page

| Zone | What lives there |
|---|---|
| Top navigation bar | Page switcher (Main, LED Mapping, Patch, Programs, Shows, Art-Net Receive), Show / Bank / Program indicator, view-controls pill, Clear button, Edit-mode pills. |
| Fixture panel (centre) | One column per patched fixture. Vertical attribute faders, top-labelled with fixture name + start address. |
| Right panel | Programs, Programs & Banks, Groups widgets. |
| Bottom panel | Attribute Manager, Programs (quick-access), Automation group (Oscillators / Audio Tracker / MIDI / VST), Masters, Channel. |
| Status indicators | USB / Art-Net connection pills and active show / bank / program label. |
| Icon | What it means |
|---|---|
| USB | Lights up when a compatible USB DMX output device is connected. |
| Network | Shows EMU’s connection to fixtures over the network (Art-Net / sACN). |
| Sliders (MIDI Learn) | Toggles MIDI Learn, press and hold on a fader or control while sending a MIDI value to map it; Backspace clears a mapping. See MIDI mapping. |
Just right of the EMU logo sit three icons:
Status icons (top-left)
Working with fixture faders
Each fixture is a column of attribute faders. Click and drag a fader handle to set its value. The handle number shows the current DMX value (0-255), or a percentage (0-100%) if you've toggled the % button in the view-controls pill.
- Double-click a fader handle to type an exact value.
- Arrow keys (↑ / ↓) nudge a selected fader by 1 unit, fine adjustment for pan/tilt.
- Default values: most attributes default to 0; Pan, Tilt, and Zoom default to 128 (centre).
Selection, single and multi
| Click style | Selects |
|---|---|
| Click fixture's border (top label) | The whole fixture. Macros and the XY position plot become applicable. |
| Click a fader handle | Just that fader. Lighter colour indicates selection. Also selects the parent fixture. |
| +click | Range select, click first, hold Shift, click last. |
| / +click | Toggle a single fixture / fader into / out of the selection. |
| / +A | Select all fixtures. |
| +click | Select the same attribute on every fixture of the same type. |
| Click grey background | Deselect everything. |
The Clear button
Clear (top of Main page) returns fixtures to their home state (Pan/Tilt/Zoom = 128, everything else = 0). It's selection-aware:
- Nothing selected → Clear resets every fixture in the active Program.
- Specific fixtures selected → Clear resets only those.
- Specific faders selected → Clear resets only those individual faders.
Clearing also removes any Sound Trackers and Oscillators applied to those faders.
Top-bar view controls

The top bar has a small dark pill on the left holding four toggle buttons:
| Button | What it does |
|---|---|
| Zoom (magnifying-glass icon) | Toggles a larger zoom of the fixture panel. |
| Fullscreen (expand icon) | Toggles fullscreen mode for the Main page. |
| % (percent icon) | Toggles fader values between 0-255 (DMX raw) and 0-100% (percentage). |
| Hide LED-mapped (eye-slash icon) | Hides fixtures mapped to the LED Mapping engine, so the Main page shows only your regular DMX fixtures. |
Next to the pill is the Clear button and the application theme toggle (light / dark, bottom-left of the window).
Widget layout
Widgets on the Main page live in fixed positions, you can't move, dock, or resize them. You can Toggle Fullscreen from the top bar to hide most chrome and give the fader panel maximum room.
Masters
- Speed, EMU's global tempo in BPM. Oscillators sync to this. Overridden by the VST3 plug-in's DAW tempo or by external MIDI Clock when present.
- Level, global intensity dimmer. Dims every fixture intelligently (skipping Pan, Tilt, Zoom). Drop to 0 for an instant blackout.
Channel
- Lock, freezes the selected fader's value across every Program in the show. Useful for fixed levels (front wash that should always be 80%).
- Invert, inverts the channel's direction globally. A Pan channel on an upside-down fixture, inverted once, then programs correctly everywhere.
Programs & Banks
Step through Banks and Programs from the Main page. Sets a per-Program fade-in transition time. Full programming workflow in the Programs.
Groups
Save selections of fixtures for one-click multi-select later. Common groupings: "front wash", "moving heads", "audience blinders".
- Add group, select fixtures (/+click), then click the + icon.
- Select a group, click the group's name. Every fixture in it gets selected.
- Rename, select the group, click the pen icon.
- Delete, select the group, click the trash icon.
Attribute Manager
The Attribute Manager is your visual control surface for whatever fixtures you currently have selected. It's context-sensitive: it fills with controls based on what the selected fixture can actually do. Select a simple dimmer and you'll see only Intensity; select a moving head and Position, Colour, Gobo, Beam, and Control appear too. With nothing selected, it's empty.
Controls are grouped into category tabs, and only the tabs your selection supports are shown:
| Tab | What's inside |
|---|---|
| Intensity | Dimmer and Shutter/strobe, plus quick presets (0, 25, 50, 75, 100%). Fixtures with no real dimmer channel (e.g. plain RGB) get a Virtual Dimmer so you can still fade them. |
| Position | Pan and Tilt on an XY pad, drag the dot to aim the fixture (8- or 16-bit precision), plus Pan/Tilt speed. Multi-select and drag to fan positions across the selection. |
| Colour | The colour picker, in whatever mode the fixture uses: Additive (RGB / RGBW), CMY (subtractive Cyan / Magenta / Yellow), Colour Wheel (pick a preset slot), Virtual colour wheel, and Colour Correct (white balance, CTO / CTB). |
| Gobo | Gobo wheels, Prism, and Animation wheels. |
| Beam | Focus, Zoom, Iris, Frost, and Framing shutters. |
| Control | The non-visual channels, fixture Mode, Macros, Reset, Lamp on/off. |
The Spread dropdown sets how a change applies across a multi-fixture selection (for example Proportional).
Programs
Quick-access Save / New / Duplicate / Delete for Programs within the active Bank. Full Program lifecycle is on the Programs page.
Automation
The Automation widget is a collapsible group that hosts everything that moves a fader for you. Four tabs at the top:
- Oscillators, waveform-driven movement (sine, square, triangle, ramps)
- Audio Tracker, drive faders from live audio input
- MIDI, drive faders from MIDI hardware or DAW automation
- VST, drive faders from the EMU VST3 plug-in inside a DAW
Each tab has a toggle switch to enable / disable that automation source globally, so you can mute (say) all MIDI input with one click without unmapping anything.
Oscillators tab
Sweeps selected faders up and down on a timed waveform. Workflow: select one or more faders → pick a waveform → tweak controls. Selected faders turn pink to indicate they're under Oscillator control.
| Waveform | Effect |
|---|---|
| Sine | Smooth wave up and down |
| Square | Hard on/off |
| Triangle | Linear up and down |
| Ramp up / Ramp down | Linear in one direction, snap back |
| Control | What it does |
|---|---|
| Bar +/- | Time per cycle, expressed in musical bars (synced to global Speed) |
| Chase | With multiple selected, spreads the oscillation as a chase across the selection |
| Shape | Morphs the base waveform, softer, harder, asymmetric |
| Phase | Offsets the starting point relative to other Oscillators |
| Amount | Size of the oscillation. Proportional to the fader's base value. |
The tab also lists every Oscillator currently running in the active Program, Play / Stop / Stop All / Delete actions, plus an "Add to library" bookmark to save the oscillator for re-use.
Audio Tracker tab
Drives selected faders from live audio input. When the audio level on the chosen frequency band exceeds the threshold, the fader snaps from 0 toward the Level dial; when audio drops, it falls back.
| Dial | What it does |
|---|---|
| Level | Upper limit the fader reaches when audio is loud |
| Attack | How fast the fader rises |
| Release | How fast the fader falls back to 0 |
Pick the frequency band (Sub, Low, Mid, Hi) from the dropdown. To remove an Audio Tracker, select the fader and either set Level to 0 or press .
MIDI tab
Drive faders, buttons, and rotary dials from MIDI input. The tab exposes Learn-mode and the list of active mappings. Full workflow in the MIDI mapping.
VST tab
Drive faders from the EMU VST3 plug-in inside a DAW, covers DAW-side automation, parameter mapping, tempo sync. Full setup in the VST3 plug-in.
LED Mapping page
LED Mapping is a separate engine inside EMU for driving pixel-mapped LED installations, strips, dot rigs, custom matrices, video walls. Instead of one fader per channel, you arrange pixels on a virtual canvas, paint patterns and scenes onto them, and EMU translates the result into the DMX channels that drive your real-world pixel hardware.
When to use LED Mapping
Regular fixture programming (Main page, Programs page) is for one-fader-per-channel control: moving heads, washes, basic LED PARs. LED Mapping is for everything-else-with-pixels:
- Pixel strips around a stage truss
- Backdrop matrices (LED walls, mesh, custom canopy)
- Custom dot rigs (one pixel per fairy-light bulb, building façade pixel mapping)
- Architectural installations with hundreds or thousands of individually-controlled LEDs
The hardware end is typically a high-channel-count DMX driver or multi-universe Art-Net node, see Connect your gear.
The LED Mapping page anatomy
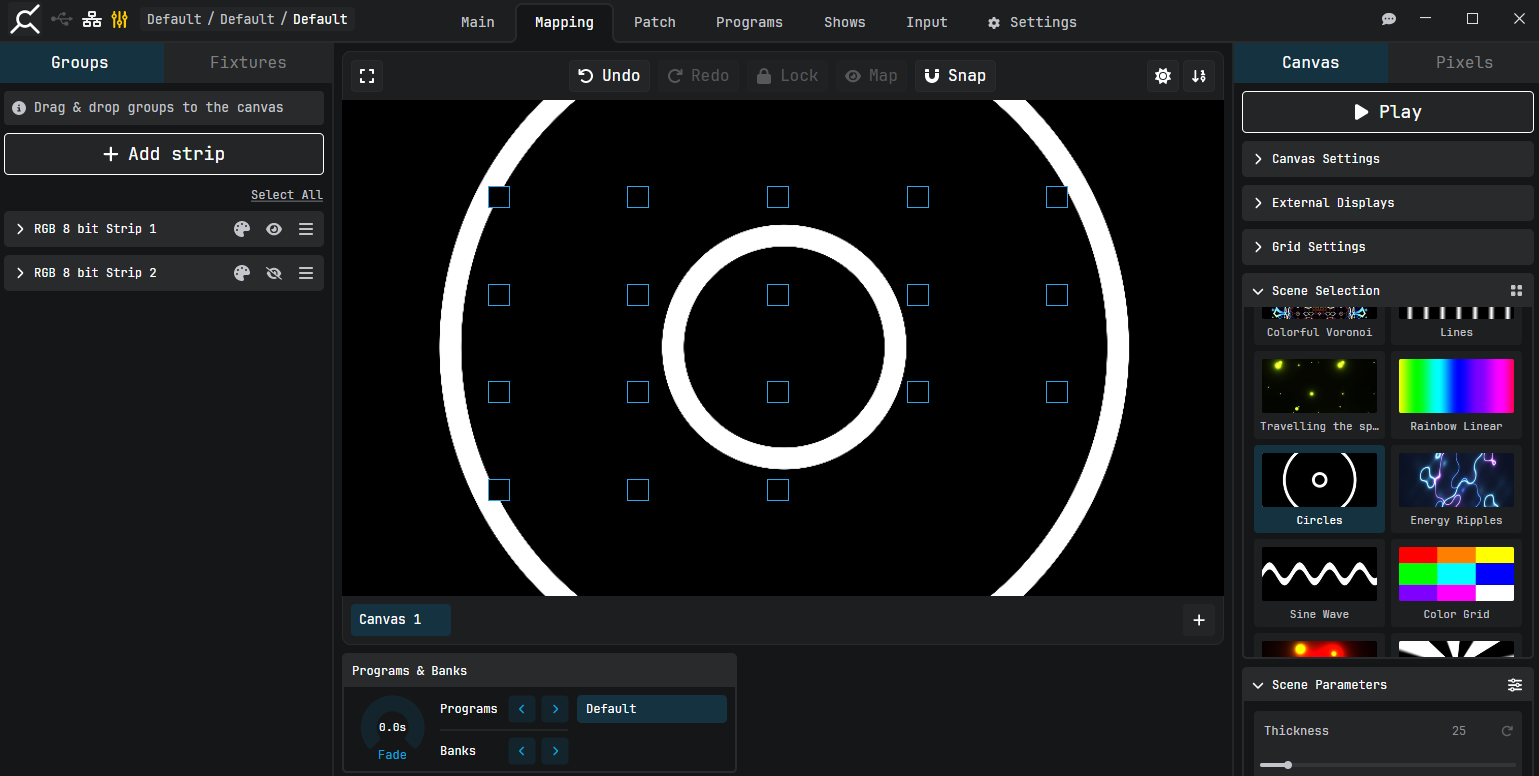
Open from the top navigation. Three-column layout:
| Column | Tabs | Purpose |
|---|---|---|
| Left panel | Groups · Fixtures | Pick what to drag onto the canvas. |
| Centre | (canvas) | The canvas itself, with a toolbar above and a Programs/Pixel Info row below. |
| Right panel | Canvas · Pixels | Canvas tab configures rendering and holds Scene Selection / Scene Parameters. Pixels tab configures pixel arrangement. |
Above the canvas a multi-canvas Canvas Tab Bar lets you create and switch between canvases; each one has its own pixel arrangement, effects, scenes, and external-display routings.
Fullscreen mode
The expand icon in the top-left corner of the canvas toolbar collapses both side panels for a maximum-size canvas view. Toggle back to restore the panels.
Adding fixtures & groups
The left panel has two tabs:
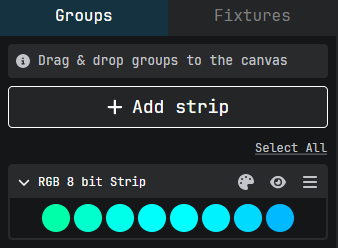
Groups tab
Lists every fixture group you've created. Each group card has a header (name + selection border + tooltip showing address range + fixture count), a palette icon, an eye visibility toggle, a menu icon, a right-click menu (Rename / Ungroup / Delete), and drag-to-canvas behaviour. Each card also shows live RGB pixel circles, the first pixel of each fixture in the group, rendered in real-time.
Fixtures tab
Lists every individual fixture. Each card has the fixture name + selection border, eye toggle (visibility on canvas), tooltip with DMX address and size, right-click → Delete (removes from LED Mapping; doesn't affect the patch), and drag to canvas to add pixels.
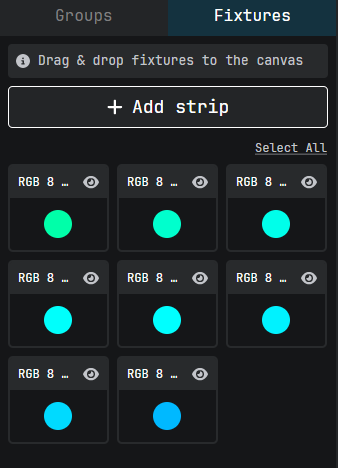
The Add Strip button at the top of either tab is the fast path to creating a new pixel strip. Both tabs have a Select / Unselect all toggle text at the bottom.
Add Strip dialog
Add Strip patches a run of pixels in one step: each LED becomes a fixture, and the strip itself becomes a group. The dialog snaps to the next free DMX address, so a new strip never overlaps fixtures you've already patched.
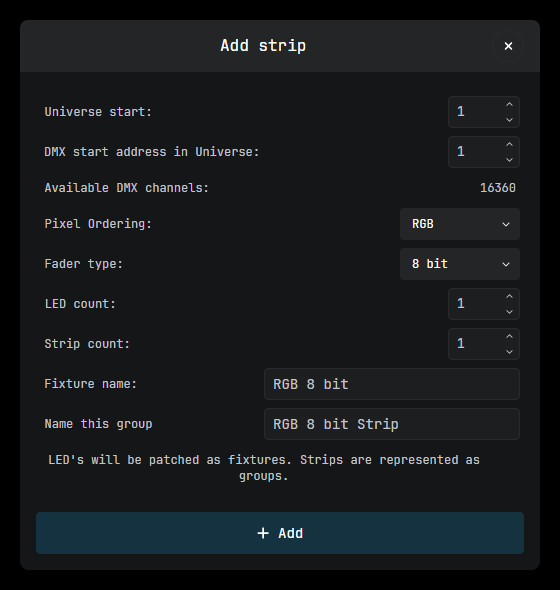
- Universe start: the DMX universe the strip's first pixel lands in. The stepper jumps only to universes that still have free space.
- DMX start address in Universe: the starting channel (1-512) within that universe. Snaps past channels already used by other fixtures.
- Available DMX channels: read-only. How many channels are free from your start point onward, so you can see whether the strip fits before adding it.
- Pixel Ordering: the colour-channel order each pixel expects (RGB, GRB, etc.). Match it to how your LEDs are wired, or the colours come out swapped.
- Fader type: per-channel resolution. 8 bit is one DMX channel per colour; 16 bit is two (finer fades, twice the channels).
- LED count: number of pixels in a single strip.
- Strip count: how many identical strips to create at once. Total channels used = LED count × Strip count × channels per pixel, checked against what's available.
- Fixture name: the base name given to each patched pixel-fixture.
- Name this group: the group name for the strip, this is what shows in the Groups tab.
The canvas toolbar

The toolbar runs across the top of the canvas. Left to right:
| Button | What it does |
|---|---|
| Fullscreen | Collapse the side panels so the canvas fills the window. |
| Undo | Reverse the last pixel move, arrangement, or mapping action. |
| Redo | Re-apply an undone action. |
| Lock | Lock (or unlock) movement of the selected pixels within the current Program, so they can't be dragged or rearranged. |
| Map | Map or unmap the selected pixels, toggles whether they're driven by the canvas or left out of its output. |
| Snap | Snap pixels to the nearest point as you drag; hold Alt (Windows) or Option (Mac) to invert the snapping. |
| Highlight | Brighten the selected pixels on the canvas so you can see what's selected. |
| Show data direction | Draw arrows on the canvas showing the DMX data-flow order through your pixels. |
Multiple canvases New
Each canvas is an independent pixel composition with its own scenes and parameters. The tabs along the bottom of the canvas (Canvas 1, Canvas 2, and so on) switch between them; the + at the end of the row adds a canvas, and the × on a tab removes it.
Multiple canvases let you build different looks on the same fixtures, a calm wash on one and an energetic chase on another, then switch or crossfade between them. With Merge Canvases turned on (in Canvas Settings, or per external display), EMU composites every canvas together, so switching Programs gives a smooth visual crossfade instead of a hard cut.
Canvas right-click menu
- Group, combine selected pixels into a new group (visible when selection spans multiple groups).
- Ungroup, split selected pixels out (visible when every selected pixel is in the same group).
Programs & Banks + Pixel Info
Programs & Banks
The same Programs & Banks controls from the Main page, embedded here so you can switch Programs without leaving LED Mapping: fade-in knob, prev/next Program, prev/next Bank, scrollable Programs list.
Pixel Info
Live readout of the current selection (visible only when pixels are selected): Selected count, Address range (U:channel format), Position (X / Y on canvas).
Right panel, Canvas tab
This is where most visual configuration lives. Top of the tab is the Play / Pause button, pauses or resumes animation playback. Below that, six collapsible sections.
Canvas Settings
| Control | What it does |
|---|---|
| Preview Resolution | Render quality for the in-app canvas preview. Higher = better fidelity, more GPU load. Doesn't affect DMX output. |
| Preview Opacity | Slider 0-100%. Adjust how visible the preview is. |
| Merge Canvases | When on, the preview shows all canvases composited together. Off = only the active canvas renders. |
External displays

Route canvas content to physical external displays, monitors, TVs via HDMI, projectors, video-wall feeds. Click a display card to toggle output on/off.
Click a display card to turn its output on. Each card has two controls:
| Setting | What it does |
|---|---|
| Resolution | Render resolution for this output (e.g. 1920 × 1080). |
| Merge Canvases | Show an additive composite of all canvases on this display, a true visual crossfade during Program switches. Off, the display shows the active canvas only. |
By default a display follows whichever canvas you're currently editing.
Grid Settings
- Show Grid, toggle grid lines on / off
- Snap to Grid, pixel drags snap to grid intersections
- Horizontal resolution, vertical grid lines (columns)
- Vertical resolution, horizontal grid lines (rows)
Scene Selection
Lists every scene available to the active canvas, organised into three tabs:
Default tab
Built-in factory scenes (colour fills, gradients, chase patterns). Read-only; use Save as variation to create an editable copy in My Scenes.
My Scenes tab
User-created scenes. Per-scene controls: Select, Capture thumbnail, Save as variation, Rename, Delete.
Videos tab
Use video files as scenes, EMU samples each frame and maps it to your pixels. Add a video with the Add Video button. Per-video: Capture thumbnail, Select, Delete, Relink video (if the source file moved). EMU flags scenes whose underlying video file is missing.
View toggle
The header has a tile-vs-list view toggle.
Scene Parameters
Every scene exposes a set of parameters, animatable values (speed, hue, brightness, density, position). Each parameter has a name + current-value text field, a Reset-to-default button, and a slider with the parameter's min/max range.
Automating a parameter
The header has a Toggle Automation Controls button. When on, each parameter row gains two buttons:
- Oscillator, popup to animate with a waveform at a chosen speed.
- Audio, popup to drive from live audio. Pick a frequency band.
Multiple parameters can have different automations active simultaneously, e.g. brightness driven by audio while hue oscillates on a slow sine.
Right panel, Pixels tab
Where you arrange pixels on the canvas. Top of the tab: row of four arrangement-type buttons.
Arrangement types
| Type | Behaviour |
|---|---|
| None (manual) | Move pixels one at a time by hand. |
| Line | Arrange selected pixels along a straight or curved path. |
| Circle | Arrange pixels evenly around a circle. Drag the centre and radius handles. |
| Grid | Arrange pixels in a 2D grid pattern. |
Movement Controls
Always visible regardless of arrangement type:
- Arrow pad, Up / Down / Left / Right nudge selected pixels by one unit.
- FlipX, mirror selection horizontally.
- FlipY, mirror selection vertically (when supported by the arranger).
Arrangement-specific controls
When an arrangement other than None is active, additional controls appear specific to that type (endpoint positions for Line, radius/start-angle/direction for Circle, rows/columns/spacing for Grid).
Pixel Settings
Per-pixel configuration (size, spacing, output channel offset). Tune individual pixel appearance and DMX mapping.
Sample-and-hold output behaviour
When a canvas stops contributing to a channel, because a scene faded out, a canvas was deleted, or the page navigated away, the LED Mapping engine doesn't immediately snap fixtures to black. It holds the last painted value.
Why? In live shows, abrupt blackouts when switching scenes look like bugs. Sample-and-hold gives you a clean visual handoff.
To force a true blackout, set the Masters Level dial to 0.
Patch page
Patching is the bridge between the abstract idea of a fixture and the concrete DMX channels that drive it. The Patch page also hosts the Devices view, where you route EMU's universes to physical output hardware.
Channel view vs Universe view
| View | Shows | Use for |
|---|---|---|
| Channel view | A 512-cell grid representing one universe. | Patching fixtures, changing DMX addresses. |
| Universe view | A list of universes with which output device(s) they're assigned to. | Routing EMU's universes to physical output devices. |
Adding a fixture (Channel view)
- Open the Patch page; you land on Channel view by default.
- In the Fixture Browser panel on the left (or Favourites / GDTF / Custom), drill down to the specific mode you want, see the Fixtures & library.
- Drag the mode onto the patch grid. As you drag, the cells highlight where the fixture would land, green for available, red for "overlaps another fixture."
- Drop it. EMU snaps the fixture into place at the first available block of cells that matches its footprint.
- The fixture gets a unique colour on the grid so you can visually distinguish it.
Setting the DMX address
Click any patched fixture to select it; details appear at the bottom. To change its start address:
- Drag it on the grid to a new position.
- Or use Change DMX address from the right-click menu, opens a dialog to type the address.
EMU prevents addresses that would overlap with another fixture.
RDM auto-discovery
If your USB-DMX interface AND every fixture in the chain support RDM, EMU can discover and address everything automatically.
- Connect everything, terminate the chain, power up.
- Open the Patch page → click the RDM action.
- EMU sends a discovery sweep down the DMX line. Fixtures respond with their identity and current start address.
- For each discovered fixture, EMU shows the matching profile. Confirmed fixtures patch automatically.
Moving, duplicating, deleting
| Action | How |
|---|---|
| Select fixture | Left-click on the grid. Selected fixture gets a blue border. |
| Move | Drag to a new position. Overlapping positions are blocked. |
| Rename | Right-click → Rename. |
| Duplicate | Right-click → Duplicate. Set how many copies to make in the Amount field; each copy lands at the next free address with the same channel mode. |
| Delete | Select → Delete button, or key. |
| Delete all | Top-right Delete all action. Confirmation required. |
The Duplicate panel makes several copies of a fixture at once, pick the fixture, set Amount, and EMU drops that many copies into the next free addresses (handy for a row of identical pixel strips or PARs).
Universe view, sending each universe somewhere
- Switch to Universe view at the top of the Patch page.
- The left panel lists every output device EMU has discovered (USB Pros plugged in, Art-Net nodes on the network).
- Pick a device. Its universe slots appear.
- Drag one of EMU's internal universes onto a device's universe slot.
- From now on, anything EMU sends on that universe goes to that device.
You can send the same universe to multiple devices (e.g. USB Pro and Art-Net), or send different universes to different devices for multi-room setups.
Device discovery
EMU auto-detects USB devices via libusb on plug-in. Art-Net devices are discovered via ArtPoll (broadcast on Art-Net's 2.x.x.x subnet). sACN devices show up via universe announcement. If a device isn't appearing, see Troubleshooting connections.
EMU Hardware Interface
The recommended USB interface for EMU. One isolated DMX output plus a built-in footswitch input. Settings:
- Refresh rate, DMX frames per second (default 44 Hz)
- Break time, DMX break duration (default 90 µs)
- MAB time, Mark After Break (default 8 µs)
- Footswitch, see Settings › Footswitch for switch type (NO/NC), single/double/hold actions, and assignable Program/Bank actions.
- Firmware version, current firmware shown; update button if newer available.
DMX USB Pro
One DMX output, USB-powered, isolated. Settings:
- Refresh rate, DMX frames per second (default 44 Hz)
- Break time, DMX break duration (default 90 µs)
- MAB time, Mark After Break (default 8 µs)
- Firmware version, current firmware shown; update button if newer available
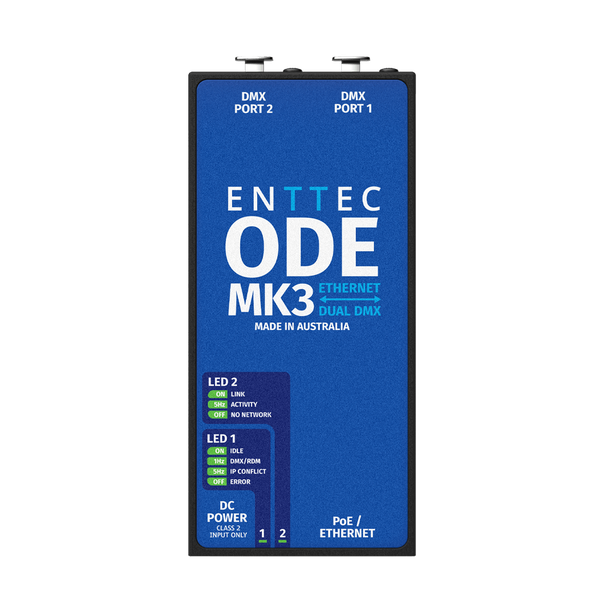
ODE Mk3
Single-universe Art-Net to DMX node. Settings:
- IP address, static or DHCP
- Art-Net universe number, which universe this ODE listens for
- DMX output direction, Output (default) or Input
Firmware updates
Every supported device has a firmware update flow inside its settings dialog. When a new firmware is available, EMU shows a notification.
Programs page
A Program is one saved lighting state, every fixture, every fader, every Oscillator and Audio Tracker in one snapshot. A Bank is a collection of Programs, typically all cues for one song or scene.
Creating a Program
- Set your fixtures to the look you want, drag faders, place positions, dial in colours on the Main page.
- Click New in the Programs widget (right panel) or in the Programs page.
- EMU saves the current state to a new Program in the active Bank.
- Optional: rename it (Programs page → double-click the name).
Renaming, arranging, cloning
- Rename, Programs page → double-click the name → type → Enter.
- Reorder, drag the three-dot handle at the end of a Program's row.
- Clone within Bank, Duplicate button.
- Clone to another Bank, drag the Program onto a different Bank.
- Delete, select → Delete button (undo with Ctrl+Z / ⌘+Z).
Banks
Banks are the parent containers for Programs. A typical show file might have one Bank per song. Create with the New Bank button. Rename / Duplicate / Delete follow the same patterns.
Fade times
Every Program has a fade-in time, seconds for EMU to morph from the previous state to this Program's state.
- 0 seconds, instant snap. Hard cue points.
- 0.5-2 seconds, natural for most scene changes.
- 4-8 seconds, slow theatrical fades.
- 10+ seconds, ambient drift between songs.
Position channels (Pan, Tilt) and colour mixing fade smoothly. Discrete channels (gobo wheel positions, strobe speed) snap at the midpoint of the transition.
Autorun

Walks through the Programs in the active Bank automatically, useful for unattended ambient playback or gallery installations.
- Set Autorun time at the Bank level, how long each Program plays.
- The transition uses each Program's own fade time.
- Loop on, Bank cycles forever. Off, stops at the last Program.
Shows page
A Show is the top-level container in EMU. It holds your patch, Banks, Programs, settings, everything except per-machine preferences (theme, license, audio device). One .emu file = one show.
The Shows window
Open from the top navigation. Lists every show on this machine.
| Action | What it does |
|---|---|
| Open | Switch to this show. EMU saves the current show first. |
| New | Create a blank show, prompt for a name. |
| Duplicate | Copy under a new name. Good for "save as" before risky changes. |
| Rename | Change the show's name. |
| Delete | Delete the selected fixture. Undo with Ctrl+Z / ⌘+Z. |
| Export | Bundle into a single .emu file for transfer or backup. |
| Import | Load a .emu file from elsewhere. |
Autosave
EMU autosaves continuously as you work. There's no Save button because there's no need, every change is written to disk within seconds.
Programs are explicitly saved (+ / +) because that decides "is this the new committed look?" Patch changes, settings, MIDI mappings autosave.
Where shows live on disk
| Platform | Default location |
|---|---|
| Windows | %USERPROFILE%\Documents\EMU\Shows\ |
| macOS | ~/Documents/EMU/Shows/ |
.emu file in Dropbox / OneDrive / iCloud.Sharing shows
- Shows window → select show → Export.
- Save the
.emufile. - Send via email / USB / cloud share.
- On the receiving machine: Shows → Import → pick the file.
The patch, all Banks/Programs, all MIDI mappings, all custom fixtures transfer. Only per-machine prefs (license, theme, output device assignment) don't carry over.
Switching shows with pending changes
When you have uncommitted edits and try to switch shows, the Shows dialog prevents the switch by default. Either save/discard pending changes, OR toggle Ignore show change to bypass.
Standalone shows on hardware
Compatible ENTTEC interfaces can play back a recorded DMX show from internal memory without a computer. Useful for permanent installations or backup if the laptop fails. Recording/playback flow is in the device's settings dialog, see Patch page → Device discovery and the per-device sections below it.
Connect your gear
EMU on your laptop is one half of the picture. The other half is the gear that takes EMU's data and turns it into actual light on actual fixtures.
How lighting control actually works
Lighting control is, at the core, simple: your laptop sends a stream of numbers to your fixtures, and each fixture interprets those numbers. Channel 1 says "be 50% bright." Channel 2 says "tilt to position 200."
The protocol those numbers travel on is DMX. It runs over XLR cable. Two things to know:
- It's one-way. Your laptop talks; fixtures listen. The RDM extension adds two-way for discovery/config, see Patch page → RDM.
- It's organised in groups of 512. Each cable carries a "universe" of 512 channels. More fixtures = more universes = more cables OR a network connection that carries multiple universes.
DMX vs Art-Net
Small rigs: USB-DMX interface + XLR cable. Bigger rigs: Art-Net (DMX over Ethernet), one network cable can carry dozens of universes.
ENTTEC hardware that works with EMU
 |
 |
 |
EMU Hardware Interface
USB · 1 universe · footswitchPurpose-built for EMU. One isolated DMX output, built-in footswitch input for hands-free Program/Bank changes (see Settings › Footswitch). Recommended starting point for new EMU users.
DMX USB Pro
USB · 1 universeThe classic. One isolated DMX port, USB-powered. Good pick if you already own one or don't need a footswitch.
ODE Mk3
Ethernet · 1 universeOpen DMX Ethernet. Receives Art-Net or sACN, outputs DMX on the XLR.
EMU works with any Art-Net or sACN node, so multi-universe nodes from any manufacturer work too. See Product codes & ordering.
Connecting it all up
Setup A, USB-DMX interface
- Plug the USB-DMX interface into a USB port on your laptop.
- DMX cable from DMX OUT of the interface to DMX IN of your first fixture (use a 5-pin to 3-pin adapter if needed).
- Daisy-chain remaining fixtures: OUT → IN.
- Plug a DMX terminator into the DMX OUT of the last fixture.
- Set the DMX start address on each fixture.
- Open EMU. The interface shows up automatically on the Patch page.
Setup B, Art-Net over Ethernet
- Plug the Art-Net node into power + network switch.
- Plug your laptop into the same switch.
- Same IP subnet (nodes default to
2.x.x.x; set your laptop to2.0.0.10with subnet255.0.0.0). - Daisy-chain fixtures off the node's DMX OUT like the USB setup.
Cabling tips that save shows
- Always use real DMX cable, not microphone cable. They look identical but have different impedance.
- Maximum 32 fixtures per chain. Past that, use a DMX splitter.
- Cable runs up to 100 m. Longer = use Ethernet (Art-Net) to extend.
- Terminator on the last fixture, always. Without it, electrical reflections cause sporadic flickering.
- Match connector pinouts. ENTTEC USB Pros are 5-pin XLR; most fixtures are 3-pin. Use the right adapter.
- Label everything. When fixture 7 misbehaves at dress rehearsal, you'll thank yourself.
Troubleshooting connections
"EMU doesn't see my USB-DMX interface"
- Close other lighting software. ENTTEC drivers let one app have the interface at a time.
- Replug. Unplug USB, wait 3s, plug back in.
- Try a different USB port. Use the laptop's own USB-A port if it has one.
- Skip USB hubs. Bus-powered hubs cause power dips. Use a powered hub if needed.
- Restart EMU if all else fails.
"EMU doesn't see my Art-Net node"
- Check the subnet. Laptop and node both on
2.x.x.xwith mask255.0.0.0. - Disable firewall temporarily. Art-Net uses UDP port 6454. Add EMU as an exception if that fixes it.
- Power-cycle the node.
- Try a direct connection, laptop straight to node, bypass the switch.
- Check the node's status LED, should blink when receiving Art-Net.
"EMU sees the interface but my fixtures aren't responding"
- Fixture's DMX start address doesn't match EMU's patch.
- Wrong cable direction. OUT to IN, daisy-chained.
- Missing terminator.
- Microphone cable in the chain. Swap each cable to isolate.
- Fixture in test/manual mode. Check the fixture's onboard menu.
Fixtures & fixture library
A "fixture" in lighting is any controllable device on stage, a moving head, an LED wash, a smoke machine, a dimmer. EMU controls fixtures by sending them DMX channel values. To do that, EMU needs to know what each fixture is, how many channels it uses, and what each channel means. That information lives in the fixture library.
The Crescit fixture library
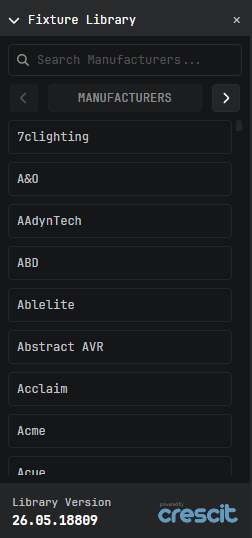
EMU ships with the Crescit cloud-backed fixture library, over 10,000 fixtures, updated weekly. The Fixture Browser navigates a three-level hierarchy:
- Search, click the search box and start typing (e.g. "Chauvet"). The list filters as you type.
- Pick the manufacturer. Click the name. The list drills to that manufacturer's fixtures.
- Pick the model. The list drills to that model's modes.
- Pick the mode, must match the mode set on the back of the physical fixture.
- Drag the mode onto the patch grid (see Patch page).
Chevron buttons (◀ / ▶) step back and forward through the hierarchy.
Favourites
Every item in the browser has a star icon. Click to add to Favourites (stored per-user, follows you to new shows).
The GDTF library
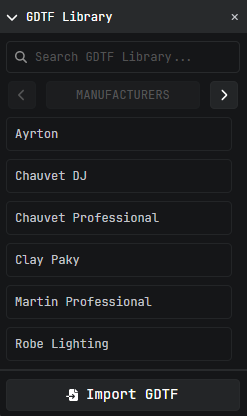
GDTF is an open standard for fixture descriptions, published by manufacturers. Useful when Crescit doesn't yet have a fixture.
Importing a GDTF file
- Visit gdtf-share.com and create a free account.
- Search for your fixture, click the download icon next to the latest revision.
- In EMU, open the GDTF Library panel and click Import GDTF.
- Pick the file you downloaded. Drag the imported fixture onto the patch grid like any other.
Custom fixtures
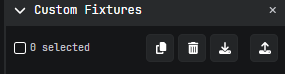
If neither Crescit nor GDTF-share has your fixture (DIY rigs, prototype gear, modded fixtures), build your own in the Custom Fixture Editor.
Custom Fixtures toolbar
| Button | What it does |
|---|---|
| Select-all checkbox | Tick / untick every fixture mode. Counter shows selection count. |
| Duplicate | Copy every selected mode. |
| Delete | Remove every selected mode. |
| Export | Save selected modes as .femu. |
| Import | Load a .femu file. |
Building a fixture
Open the editor by creating a new fixture or right-clicking an existing mode → Edit. Define: manufacturer name, fixture name, mode name, channels (per-channel attribute + default value). Save and the fixture appears in the Custom Fixtures panel.
What if my fixture is missing?
- Update the library first. Settings › Fixtures → Update.
- Try GDTF-share. Many manufacturers publish there before Crescit.
- Request it. Email your region’s ENTTEC team with the manufacturer, model, product-page link, manual, and DMX channel map: AU / Asia-Pacific, Americas, Europe / UK, Middle East, China.
- Build it yourself in the Custom Fixture Editor.
Art-Net DMX Receive page
A dedicated page for monitoring inbound DMX traffic on the network or USB, with detailed per-source metadata and a live plot of channel values.
Live monitoring views
The page offers three live views:
| View | What it shows |
|---|---|
| Live EMU Output | The live DMX values EMU is sending right now, channel by channel, handy for checking your patch and Programs produce the values you expect. |
| Live Art-Net | Art-Net received from any device on the network. Pick the network adapter and EMU lists every Art-Net universe it sees; click one to watch its channel values live. |
| USB DMX input | With a DMX USB Pro connected and another controller feeding its INPUT connector, this shows the incoming DMX stream. |
Page layout
Two columns:
- Left column, input device selector dropdown (Art-Net network adapter OR a DMX USB Pro) and a list of discovered sources.
- Right column, detail panel + live plot for the currently-selected source.
Source detail
- Received at, timestamp of the most recent frame (ms precision)
- Net / Subnet / Universe Number / Art-Net Port Address, protocol-level address breakdown
- FPS, frame arrival rate. Healthy Art-Net is 30-50 Hz.
- Hold toggle, freezes the live plot at the current frame for inspection.
Settings dialog
Every Settings tab, what each does. This section is the desk-side reference for "I know there's a setting for X but I can't find it."
Where Settings lives
Click the cog icon in the top navigation. The Preferences dialog opens with a left-hand sidebar listing the tabs (Merge and Footswitch appear only for advanced merge tuning and when footswitch hardware is connected).
| # | Tab | What it configures |
|---|---|---|
| 0 | Output | Per-device output configuration |
| 1 | Audio | Audio input + frequency bands |
| 2 | MIDI | MIDI ports + Bank/Program-change channels |
| 3 | Account | License + telemetry consent |
| 4 | Fixtures | Fixture library version + manual update |
| 5 | Remote | Remote-control protocols (OSC, network triggers) |
| 6 | Updates | EMU app updates + release notes |
| 7 | Advanced | Power-user options + logs folder |
| 8 | About | Version + copyright + links |
Output
Global output settings and a per-device table for everything EMU is sending DMX to.
- Rescan for devices button, forces a fresh USB + Art-Net scan. Useful if a device was plugged in after EMU started.
- Output refresh rate (FPS), global frames-per-second for all DMX output. Default ~44 Hz. Lower it on very-many-universe setups if you see latency; raise it (carefully) for super-smooth animation.
- Device table, one row per discovered output device with five columns: Device Name, Output Method (USB / Art-Net / sACN), Destination (IP or USB serial), Configure (per-device dialog), Enabled (per-device on/off toggle).
Click Configure on any row to open the per-device dialog, same as the dialogs reached from Patch page → Devices (EMU Hardware Interface, DMX USB Pro, ODE Mk3, etc.). The Enabled toggle lets you mute a device's output without removing it from the patch.
Audio
Audio input source, sample rate, frequency band ranges, logarithmic curve toggle. See Audio reactivity.
MIDI
MIDI port selection, Bank/Program change channel assignments, refresh action. See MIDI mapping.
Account
This is the License tab in everything-but-name. Activate, change, or deactivate licenses. View current tier. See Licensing.
- Send usage data, anonymous telemetry. No personally identifiable info.
- Send crash reports, stack trace + breadcrumb operations on crash.
Fixtures

Crescit library version, manual update trigger, rollback. See The Crescit fixture library.
Remote
Settings for controlling EMU from external network sources beyond MIDI and Art-Net, including . Exact options vary by version.
Updates
EMU app updates, channel, auto-download, release notes history. See Software updates.
Advanced
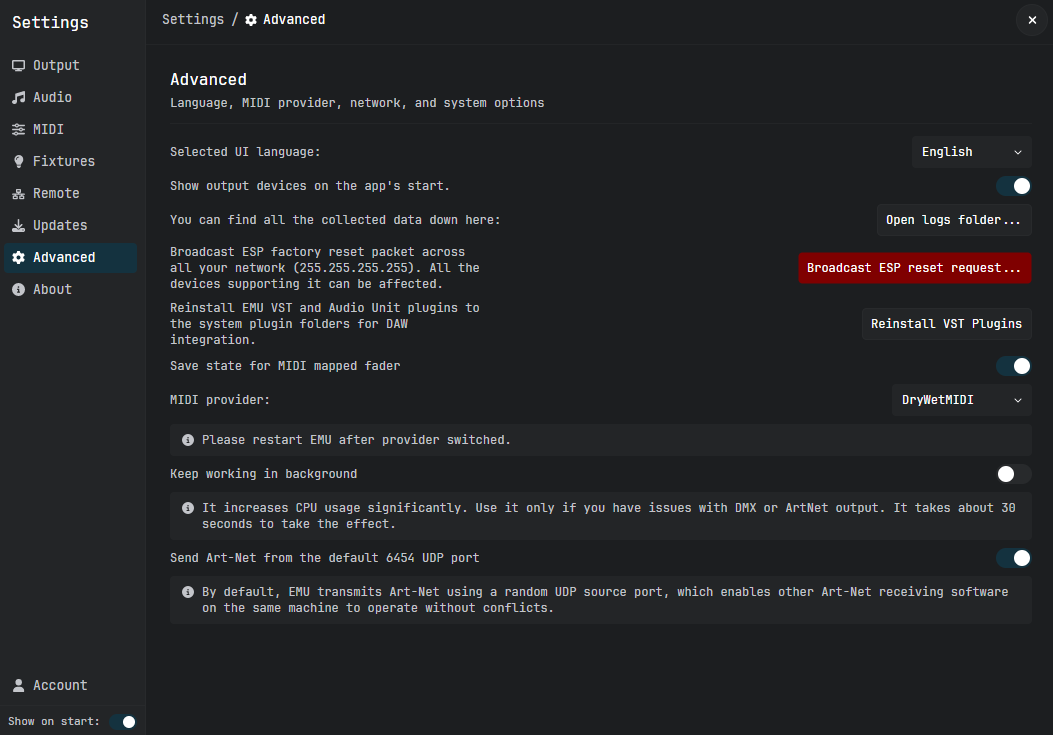
- Open logs folder, reveals the log directory in your OS file explorer.
- Diagnostic toggles, experimental options.
About
EMU version, build number, copyright, website / social links. Find your build number here when filing a bug report.
MIDI mapping
MIDI is the easiest way to drive EMU live with hardware. Plug in a controller, switch to Learn mode, twiddle the knob you want mapped, click the fader in EMU that should respond, done.
Connecting a MIDI controller
- Plug in your USB MIDI controller.
- Open Settings › MIDI → click Refresh.
- Select your device from the MIDI port list.
- Click OK. Press a button on the controller, the "Received MIDI event" indicator should light up.
EMU works with any class-compliant USB MIDI device. Virtual MIDI (loopMIDI on Windows, IAC Driver on macOS) also works.
Fixed MIDI commands (always on)
| MIDI command | EMU action |
|---|---|
| CC 0 (any value) | Advance to the next Bank |
| Program Change | Advance to the next Program |
Learn mode, mapping faders
- Click the yellow MIDI box in the Main window (above Macros and Clear).
- Select the fader(s) you want to map.
- Twist the knob or move the slider on your controller. EMU pairs them.
- Exit Learn mode by clicking the yellow box again.
Unmapping
- Enter Learn mode.
- Select the mapped fader / route / button / dial.
- Press .
Footswitch tab
Appears in Settings › Footswitch when ENTTEC hardware with footswitch input is connected. Configure switch type (NO/NC), single/double/hold actions, double-click window. Assignable actions: next/previous/random/last/first Program or Bank.
Audio reactivity
EMU can listen to live audio and drive fader values from it. The Audio Tracker tab in the Automation group is the interface; this section is the audio setup behind it.
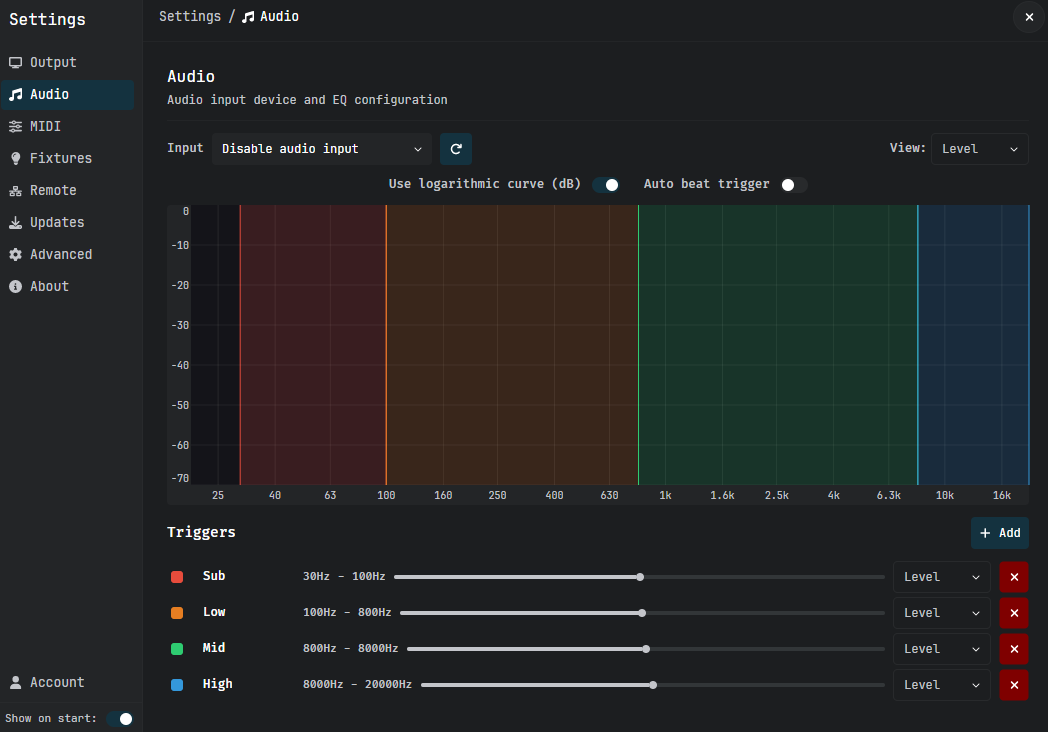
Selecting an audio input
- Open Settings › Audio.
- Click Refresh if a new source was just plugged in.
- Pick your audio source from the dropdown.
EMU sums stereo Left + Right at 48 kHz.
Frequency bands
| Band | Default range (Hz) | Typical content |
|---|---|---|
| Sub | 30 - 100 | Kick drum, sub-bass |
| Low | 100 - 800 | Bass guitar, low vocals |
| Mid | 800 - 8,000 | Vocals, snare, guitar |
| Hi | 8,000 - 20,000 | Cymbals, sibilance |
Each band has its own level slider (default 50%). Hz ranges can be redefined.
Using software loopback (route a DAW to EMU)
- Windows: install VB-CABLE. Set DAW output to "CABLE Input"; EMU audio input to "CABLE Output".
- macOS: use BlackHole, Loopback (Rogue Amoeba), or built-in Multi-Output devices.
VST3 plug-in
EMU ships a VST3 plug-in that lets your DAW drive EMU's Programs, Banks, and individual faders via automation. Run a lighting show in perfect sync with audio playback.
Installation
The plug-in is installed alongside EMU at:
| Platform | VST3 location |
|---|---|
| Windows | C:\Program Files\Common Files\VST3\EMU.vst3 |
| macOS | /Library/Audio/Plug-Ins/VST3/EMU.vst3 |
Open your DAW, rescan plug-ins, add EMU to any track.
Tested DAWs: Ableton Live, Logic Pro, FL Studio, Reaper, Cubase, Studio One.
Parameters exposed
| Parameter | Controls |
|---|---|
| Program | Selects which Program is active. |
| Bank | Selects which Bank is active. |
| Bypass | Standard plug-in bypass. |
| Fader 1 → Fader 512 | One parameter per DMX channel. |
| PPQ, Tempo, Bar | Internal sync, read-only. Tempo at 0 returns master speed to EMU. |
Mapping a fader to a VST parameter
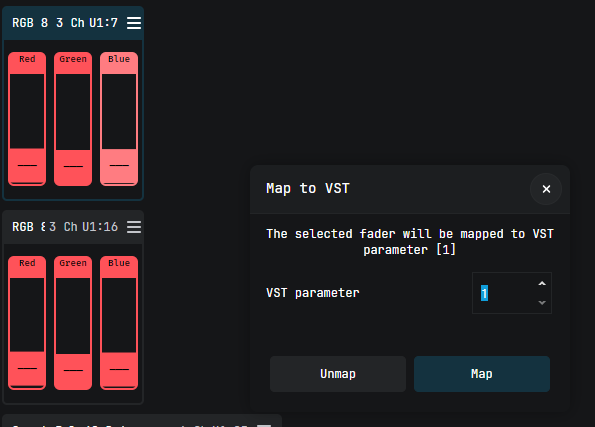
- In EMU, right-click the fader you want to automate.
- Choose VST Mapping.
- Pick a VST parameter (e.g. "Fader 1").
- The fader turns blue, indicating VST control.
- In your DAW, automate that parameter. As the DAW plays, the EMU fader follows.
Tempo sync
While the plug-in is active and the DAW is playing, EMU's Speed master automatically tracks the DAW's tempo. Oscillators sync to that tempo.
Backup, recovery & troubleshooting
When things go wrong, this is the section you open.
Backing up your work
Before any update, big show, or risky experiment: Shows window → Export → save the .emu file to USB / cloud / email-to-self. Restore by importing on any EMU install.
Recovering a corrupted show
- EMU autosaves show files to
~/EMU/Shows/as folders. - If a show fails to open: rename its folder to
SHOW.brokenand try opening a fresh copy. - EMU keeps last-known-good autosaves in
SHOW/.autosave/. - If all autosaves fail: contact ENTTEC support with the raw XML files.
Log files
| Platform | Log location |
|---|---|
| Windows | %USERPROFILE%\EMU\logs\emulog.txt |
| macOS | ~/EMU/logs/emulog.txt |
Or use Settings › Advanced › Open logs folder.
Crash reports
When EMU crashes, it captures a structured report including the stack trace and the last 256 in-memory "breadcrumb" operations. With Settings › Account consent on, the report uploads to ENTTEC. Never contains your show file, license details, or any PII.
Sending feedback
The Feedback button in the top right of the Main window opens a dialog with a description field and auto-attached screenshot.
Common symptoms
| Symptom | First thing to check |
|---|---|
| EMU won't see my USB-DMX | Close other lighting software ("EMU doesn't see my USB-DMX interface") |
| Art-Net node missing | Subnet match, both on 2.x.x.x |
| Random fixture flickering | Cable / terminator (Cabling tips that save shows) |
| Fixture won't respond | Start address must match between fixture and EMU's patch |
| EMU dropped to Free tier | License hasn't validated in 30 days, reconnect to internet |
| MIDI mapping not working | Refresh in MIDI settings, check Received MIDI event indicator |
| VST plug-in not in DAW | Rescan plug-ins, check VST3 install path |
| Show won't load | Recovery folder (above), try fresh autosave |
| Crash on startup | Rename ~/EMU/Shows/last-open.show and try again |
Glossary
A-Z reference for every technical term used in this manual.
Terms
| Term | Definition |
|---|---|
| Art-Net | Protocol for transmitting DMX over Ethernet. Default subnet 2.x.x.x, UDP port 6454. |
| ArtPoll | Discovery component of Art-Net. |
| Attribute | One controllable property of a fixture (intensity, pan, tilt, red, green, blue, gobo, shutter). |
| Autorun | EMU feature that steps through Programs in a Bank automatically. |
| Bank | A collection of Programs. Usually one Bank per song. |
| Canvas | The 2D virtual space in EMU's LED Mapping engine. |
| CC | Continuous Controller, MIDI message type for knobs/faders. Range 0-127. |
| Channel | One number from 0-255 sent down a DMX cable. |
| Crescit | Cloud-backed fixture-library partner. |
| DAW | Digital Audio Workstation, Ableton, Logic, FL Studio, Reaper, Pro Tools, Cubase, Studio One. |
| DMX | Digital Multiplex. Officially DMX512-A (ANSI E1.11). Serial protocol at 250 kbps, 512 channels per universe. |
| EMU Hardware Interface | ENTTEC's purpose-built EMU USB interface, one isolated DMX output plus a footswitch input (SKU 70681). |
| DMX USB Pro | ENTTEC's flagship single-port USB-to-DMX interface (SKU 70304). |
| Edit mode | EMU operating mode where Program edits are tentative. |
| Fade time | Seconds between two Programs' states when switching. |
| Fader | A vertical slider on the Main page controlling one fixture attribute. |
| Favourites | Per-user list of frequently-used fixtures, accessible across all shows. |
| Fixture | Any controllable lighting device. |
| Footprint | The number of DMX channels a fixture occupies in its current mode. |
| FPS | Frames per Second. EMU's merge engine runs at 60 FPS internally. |
| GDTF | General Device Type Format. Open file standard for fixture profiles. |
| GOBO | "Goes Before Optics", a patterned disc in front of a fixture's lamp. |
| Group | Saved selection of fixtures, re-select them all with one click. |
| LED Mapping | EMU's pixel-mapped LED engine, separate from regular fader programming. |
| Live mode | EMU operating mode where every change goes straight to DMX output. The default. |
| Master | Global control affecting everything (Level master = global dimmer; Speed master = global BPM). |
| MIDI | Musical Instrument Digital Interface, protocol for keyboards, control surfaces, DAWs. |
| Mode | One of a fixture's operating configurations. |
| Node | An Ethernet-connected device that receives Art-Net or sACN and outputs DMX. |
| ODE Mk3 | ENTTEC's Open DMX Ethernet, Mk3. Single-universe Art-Net to DMX node. |
| OSC | Open Sound Control, alternative network protocol to MIDI. |
| Oscillator | EMU's waveform-driven fader-movement tool, inside the Automation widget. |
| Patch | The mapping of fixtures to DMX channels and universes. |
| Preview channel | EMU's faster-cadence release channel. |
| Program | An individual saved lighting state. |
| RDM | Remote Device Management. Two-way DMX extension for discovery / config. |
| sACN | Streaming ACN (ANSI E1.31). Newer alternative to Art-Net. Multicast-based. |
| Sample-and-hold | LED Mapping behaviour where the last painted value persists when a canvas stops contributing. |
| Scene | An LED Mapping saved state, equivalent to a Program in the fader world. |
| Show file | Top-level container, Banks + Programs + patch + settings, saved as .emu. |
| Stable channel | EMU's slower-cadence release channel. |
| Terminator | 120-ohm resistor in an XLR plug, at the end of a DMX chain. |
| Universe | A group of 512 DMX channels travelling together. |
| VST3 | Virtual Studio Technology 3. Steinberg's plug-in format. |
| Voucher code | Unique license key. Format VEMU-XXXX-XXXX-XXXX-XXXX-XXXX. |
Cheat sheet
Every keyboard shortcut, every right-click menu, every drag gesture, in one searchable table.
Keyboard shortcuts
| Shortcut | Context | Action |
|---|---|---|
| + / + | Anywhere | Save current Program |
| + / + | Main page | Select all fixtures |
| / | Patch / mappings | Delete selected |
| Audio Tracker / VST mapping | Remove from selected faders | |
| License dialog, input dialogs | Submit | |
| Any dialog, Patch page | Cancel / exit | |
| Anywhere in manual | Open keyboard shortcut help | |
| / | Selected fader | Nudge value ±1 |
Click modifiers
| Modifier | Action |
|---|---|
| Click | Select single fixture or fader |
| +click | Range select |
| / +click | Toggle into / out of selection |
| +click | Same attribute across same fixture type |
| Double-click fader | Type exact value |
| Double-click widget title | Minimise / restore widget |
| Right-click fixture | Rename / Duplicate / Change DMX / Delete |
| Click grey background | Deselect everything |
Drag gestures
| Drag | Action |
|---|---|
| Fixture from browser → patch grid | Patch the fixture |
| Patched fixture on grid | Change DMX address |
| Program → another Bank | Clone to that Bank |
| EMU universe → device slot | Route output |
| Widget title bar | Move / undock widget (Patch / LED Mapping pages) |
Fixed MIDI commands
| MIDI command | Action |
|---|---|
| CC 0 (any value) | Next Bank |
| Program Change | Next Program |
Contributor priority (who wins)
From lowest to highest, when multiple contributors set the same channel, the highest wins.
| Priority | Contributor |
|---|---|
| 0 | FaderBase (Program's stored value) |
| 10 | Audio Tracker |
| 50 | VST3 |
| 80 | MIDI |
| 100 | Oscillator |
| 150 | LED Mapping |
Product codes & ordering
ENTTEC product SKUs referenced in this manual. Visit enttec.com or your regional distributor to order.
EMU
| Product | SKU |
|---|---|
| EMU lighting control software | 70680 |
DMX interfaces & nodes
| Product | SKU |
|---|---|
| EMU Hardware Interface | 70681 |
| DMX USB Pro | 70304 |
| ODE Mk3 | 70405 |