
Creates and edit light shows with S-PLAY Programmer, seamlessly integrating with third-party systems and scaling up with multiple unit
S-PLAY Programmer is a free desktop application for ENTTEC S-PLAY hardware that lets you build complete light shows offline, on Mac or Windows. Connect to your device and deploy when you're ready, no internet connection, no hardware needed to get started.
If you already use the S-PLAY smart light show controller, you already know this software. S-PLAY Programmer is the desktop version of the same interface: the same playlist builder, the same scheduling and trigger options, and the same cue types, plus two additions exclusive to the desktop software. Scene Cues is a new cue type that renders shader-based animations using the new Fixture Layouts to map them across your rig.
The key difference is that you can now build your complete show without needing to be connected to your S-PLAY hardware. Work from anywhere, whether that's the office, home or on the road, and upload when you're ready. Connect to the same network as your S-PLAY and deploy in one click or export a show file and upload it manually at any time.
Visit the ENTTEC website to download S-PLAY Programmer for free, no licensing, no activation, and no dongle required. Full features are available at no cost.
KEY FEATURES
- macOS & Windows Compatible
- 100% Free: No license or dongle needed
- Fully Offline: Build complete shows without hardware connection.
- Work Anywhere: Program from office, home or on the road.
- Create up to 200 Cues, Playlists & Schedules
- Scene Cue with shader-based animation
- Bake rendering: generate hours of content in seconds
- Layout system for fixture mapping
- Deploy & Extract shows over network
- Live preview on up to 250 S-PLAY devices
- Events, Triggers & custom end-user interfaces
S-PLAY Programmer Installation
Computer Requirements
Operating System
S-PLAY Programmer is compatible with the following operating systems:
| macOS | macOS 15 (Sequoia) and above |
|---|---|
| Windows (64 Bit) | Windows 11 and above |
Minimum Recommended Computer Specification
| Component | Mac | PC |
|---|---|---|
| Operating System | macOS 15 (Sequoia) | Windows 11 |
| Processor (CPU) | Apple M1 | Quad core 1.8 GHz |
| GPU | 8-core GPU | 4 GB VRAM |
| RAM | 8 GB RAM | 8 GB RAM |
| Drive | Mechanical HDD | Mechanical HDD |
Recommended Computer Specification
| Component | Mac | PC |
|---|---|---|
| Operating System | macOS 26 (Tahoe) | Windows 11 |
| Processor (CPU) | Apple M1 Pro / M2 | Quad core 2.5 GHz CPU |
| GPU | 14-core GPU or better | 8 GB VRAM or better |
| RAM | 16 GB RAM | 16 GB RAM |
| Drive | SSD | SSD |
Always factor in other software running on your computer and their usage of your system.
Installing the Software
The S-PLAY Programmer can be downloaded from our website. Please download the relevant installer for your computer.
Software Versions: Production Version
- Blue play button logo
- Public release for customers
- Available for download from ENTTEC website
Windows Installation
- Locate the downloaded SPLAYSoftware_Setup.exe file
- Double-click to run the installer
- Follow the installation wizard prompts
- Click "Install" to complete setup
macOS Installation
- Locate the downloaded SPLAYSoftware.dmg file
- Double-click to mount the disk image
- Drag S-PLAY Programmer icon to Applications folder
- Launch from Applications folder
After completing installation, the software is ready to use immediately. No activation, license, or additional setup is required.
⚠️ Note: S-PLAY Programmer operates offline and does not require an internet connection for programming. An internet connection is recommended for software updates. Network connection (LAN) to S-PLAY hardware is required for Preview, Deploy, and Extract functions.
Forum & Tech Support
If you have any questions about using S-PLAY Programmer or feature requests that are not covered within this manual, visit the ENTTEC Support Forum to find previous threads or raise a new request:
When raising a request, reporting a bug, or creating a support enquiry, include as much information as possible to allow ENTTEC's developers to understand and replicate what you are facing in addition to the desired outcome. The clearer this information is, the faster a resolution can be found.
Reports should include:
- Your Computer's Operating System & Version
- S-PLAY Programmer version number (Found by navigating to > Help > About S-PLAY Programmer)
- A detailed description of the issue / request
- A screen recording, video, or screengrabs of the issue
Licensing
- S-PLAY Programmer operates completely FREE with no license required.
- Simply download and install - the software is ready to be used immediately.
- The trade-off: S-PLAY Programmer is an offline programmer and cannot output DMX directly. All output and playback require connection to S-PLAY hardware.
Software Updates
S-PLAY Programmer automatically checks for updates and notifies you when a new version is available.

Automatic Update Process:
- On launch, the software automatically checks for updates.
- The “Check for Updates” button appears in the top Home navigation bar.
- When no update is available: The button remains grey.
- Clicking it will manually re-check for updates.

- When a new version is available: The button changes to display the new version number. The version number becomes clickable.
- Clicking the version number initiates the update process.
- The update downloads automatically.
- The software restarts once the update is complete.
Hardware Compatibility
S-PLAY Programmer Software is designed exclusively for ENTTEC S-PLAY hardware. No other hardware is supported.
⚠️ Note: S-PLAY Programmer Software is only compatible with S-PLAY firmware Version 3.2 and above.
Currently Supported:
- S-PLAY SP-1 (SKU 70092) - Full support for all features
⚠️ Note: S-PLAY Programmer Software does not output DMX directly. It requires connection to S-PLAY hardware for preview and deployment functions.
How Do I Connect S-PLAY Hardware?
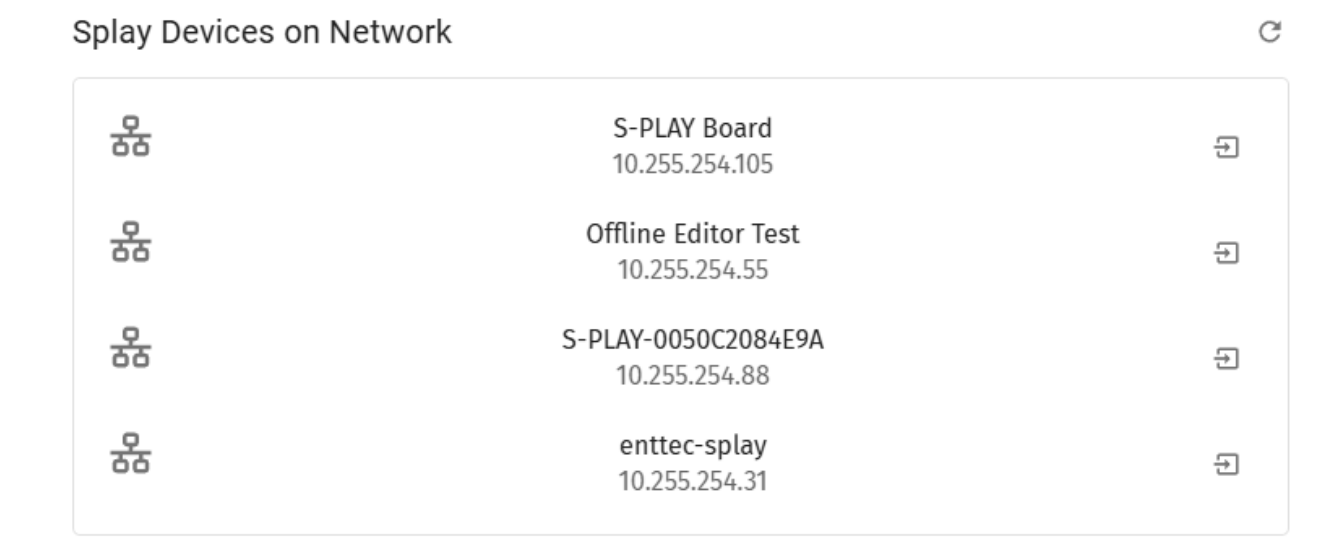
To connect S-PLAY Programmer to S-PLAY hardware on your network, follow the steps below:
Automatic Discovery & Connection
- Open S-PLAY Programmer.
- The software automatically scans the network for available S-PLAY devices.
- Detected devices appear showing:
- Device Name
- IP Address
- Select the desired S-PLAY device from the list.
After Connection
- The software automatically begins Extracting show from S-PLAY board.
- The current show stored on the S-PLAY hardware is loaded into the software.
- The connected S-PLAY device name appears in the top header navigation bar.
- Click the device name to switch to another S-PLAY on the network if needed.
Send & Extract
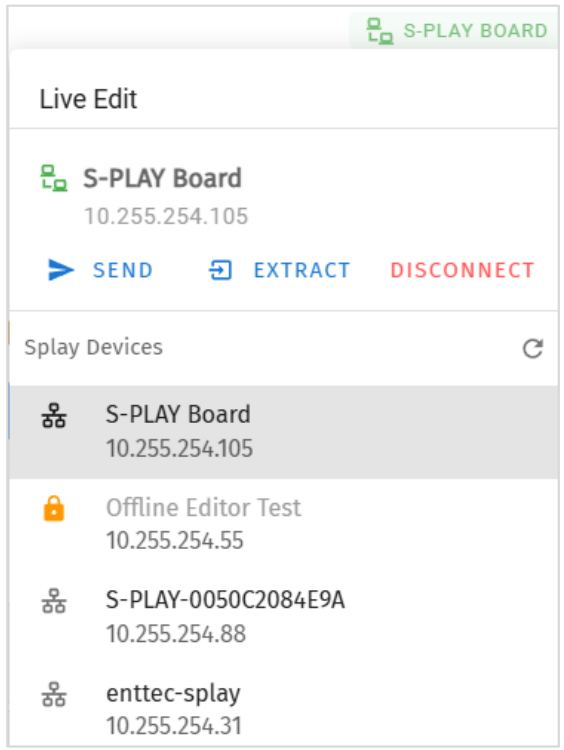
- Send – Deploys the current show (programme) from the software to the connected S-PLAY (overwrites device content).
- Extract– Retrieves the current show stored on the S-PLAY into the software (overwrites the current workspace).
Locked Device
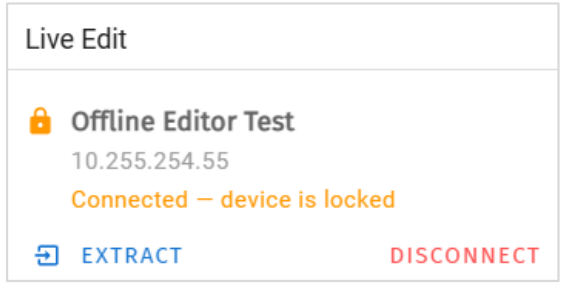
- Connection for editing is blocked.
- Send function is disabled.
- This prevents unauthorized editing or network/data bypass.
Multiple S-PLAY Devices
Software supports up to 250 S-PLAY devices on a single network.
Software Interface Overview
S-PLAY Programmer provides a comprehensive desktop interface for programming lighting shows. The interface is adapted from the S-PLAY web interface with modifications for desktop operation.
Top Menu
The S-PLAY Programmer consists of the following pages:

Home
The Home page, which is the default landing page presents an overview of all playback activities going on the S-PLAY.
The homepage can be used to as a system page for the end users to view all custom interfaces, playlists and schedules:
Interfaces:
- Navigate to custom interfaces
Playlists
- View/Set intensity for all Playlists
- Play/Pause all Playlists
- Stop all Playlists
- Play individual Playlist
- Pause individual Playlist
- Stop individual Playlist
- View/Set intensity individual Playlist
- View/Set progress individual Playlist
Schedules:
- Activate schedules
- Pause schedules
⚠️ Note: Specific interfaces, schedules, playlists can be hidden from the home page by selecting the ‘Hide from Home’ option on each of their configuration pages.
Cue
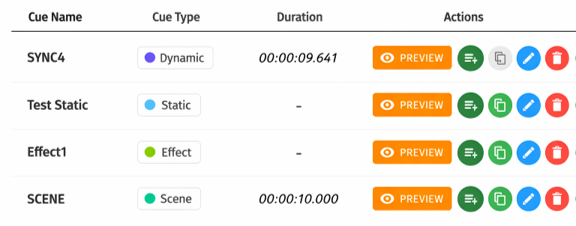
S-PLAY allows a maximum of 200 cues created from a combination of Static, Dynamic, Effect, and Scene Cues. The dedicated Cue page offers an array of functionalities, allowing cues to be easily configured, duplicated, edited, and previewed before building into a playlist.
4 key types of cues that can be created by using the green icon:
Static: A lighting state of up to 32 DMX Universes. DMX data can be user-defined values or a snapshot of the incoming DMX frame. This can be incorporated into a playlist with applied fade-in/out times.
Dynamic is a recording of up to 32 universes of lighting control data. The S-PLAY provides various methods to allow a perfect loop when recording over a user defined period.
Effect: Capable of creating a gradient effect within the S-PLAY without the need for a physical DMX source or lighting design software.
Scene Cues: These can ONLY be created in S-PLAY Programmer. This feature does NOT exist on the S-PLAY hardware web interface. Once deployed to S-PLAY, the hardware treats Scene Cues as normal cues. End users see no difference. Scene Cues are animation-based cues that use shaders and layouts to create complex lighting effects.
Managing Cues
All cues can be ordered by ID, Cue Name, Cue Type & Duration. Preview, Duplicate Edit or Delete Static or Effect Cues from the Cue page.
| Icon | Functionality |
|---|---|
 | Directly turn a Cue into a Playlist |
 | Duplicate Cue |
 | Edit Cue name and channel values after a cue has been created. |
 | Delete Cue |
 | Preview cues. Multiple cues can be previewed simultaneously. Actively playing cues will have a green "PREVIEW" buttons. To stop previewing, simply click on the green "PREVIEW" button. |
⚠️ Note:
- Dynamic recordings cannot be duplicated.
- Editing it in the Cue Library directly overwrites the full universe values received and extends the length of the cue if necessary.
- Once a cue is selected to be edited, the S-PLAY will internally trigger the Stop All command to stop all playback on the S-PLAY to stop overlapping.
Static Cue
The Static Cue can be generated by either capturing DMX snapshot from external sources or using the inbuilt editor to define DMX value manually.
Follow the instructions below to create static cue at your preferred method.
- Click the green icon and choose "Static" as the cue type to open the Static cue editor window.
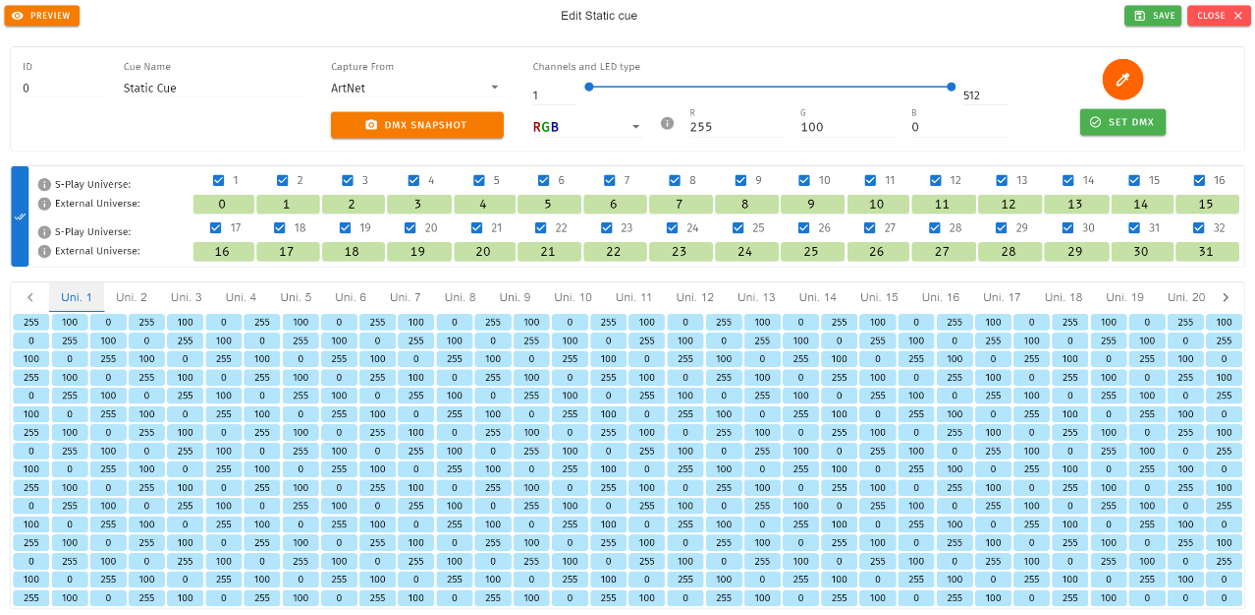
- Start by assigning a name to the cue for easy identification.
- Next, choose the source protocol and specify the desired channels to be utilised for the recording.
- DMX (up to 2 Universes)
- Art-Net (up to 32 Universes)
- sACN (up to 32 Universes)
- Select the S-PLAY’s Universe, which represents the internal universe designated for recording within the S-PLAY.
- Specify the External Universe, corresponding to the universe of the external source or the DMX port of the S-PLAY.

Tip: You can also set all external universe numbers to be identical if you want to mirror the same external Art-Net / sACN source to all internal universes.
- There are 3 ways to define the channel values:
- Manually set individual channel values and press 'Set DMX' to populate the selected channels.

- Use the Colour Picker from the colour palette and press 'Set DMX' to apply and populate the selected channels.

- Capture a DMX frame from the selected DMX source connected to the S-PLAY by pressing the ‘DMX Snapshot’. It will automatically populate the recorded DMX values to the selected channels and Universes.

- If you wish to view the output live, press the ‘Preview’ button at the top left of the interface to send to connected S-PLAY hardware, which outputs to fixtures as defined on the Settings page.
- Save the cue once completed.
⚠️ Note: When setting single-channel or dimmer fixtures, choose 'All/W' for individual channel control.
Dynamic Cue
Dynamic Cues are recordings that allow DMX/Art-Net/sACN streams to be recorded and integrated into a show. Follow the instructions below to create a dynamic cue at your preferred methods.
- Click the green icon and choose "Dynamic" as the cue type to open the Dynamic Cue editor window.
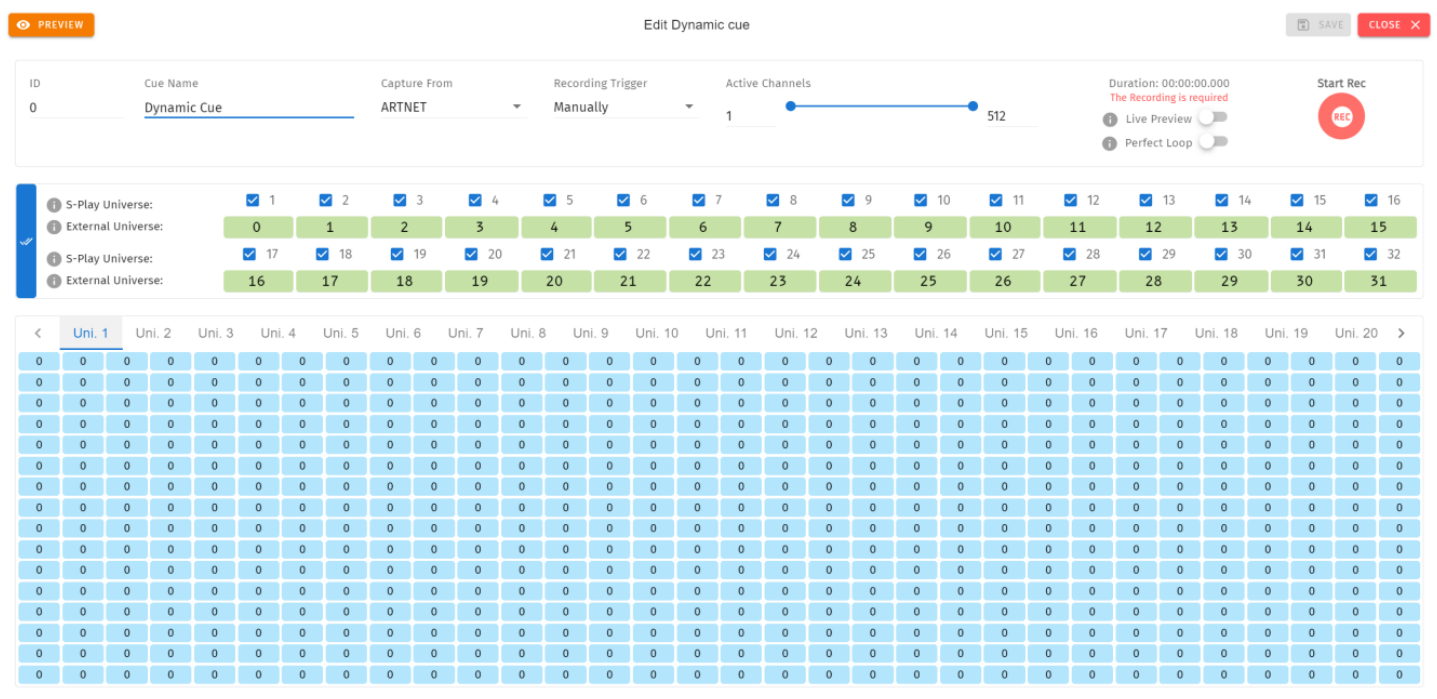
- Start by assigning a name to the cue for easy identification.
- Select one of the following options for data capture:
- DMX (up to 2 Universes)
- Art-Net (up to 32 Universes)
- sACN (up to 32 Universes)
- Activate the Internal Universe for recording.
- Specify the External Universe, corresponding to the universe of the external source.
- There are 2 ways to record:
- Manual cue recording by clicking the red "Start Rec" button.

- Configure a Recording Trigger to precisely initiate and stop recording, enabling you to effortlessly capture a show using a remote trigger. Select recording triggers from the options below:
- OSC, UDP, RS232 triggers start on message received and stop when same message received again.
- Art-Net, sACN, DMX triggers start when a value is received that is equal or above the ‘Trigger Level’. It will then stop when the value drops below.
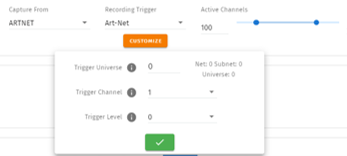
- Digital Input: when configured as ‘Activate on Break’ - Recording starts when the connection between the Digital input port and GND is broken and stops when the connection is made. This is reversed when set to ‘Activate on Make’.
- Button: Reset/Trigger button on the device can be set to trigger the recording on press or release.
- Toggle Live Preview on to send to connected S-PLAY hardware, which outputs to fixtures as defined on the Settings page.
- Once the recording is initiated, the timer in the top right of the window will start running as soon as data begins to be captured. The DMX values captured will be shown for their corresponding channels.
⚠️ Recording Tips: During Art-Net or sACN recording, when utilizing the 'live preview' function, it is crucial to ensure that no other active Art-Net/sACN device is outputting on the same universes that are being recorded (including the S-PLAY itself). This precaution eliminates the possibility of interference loopback, which can result in erratic or inaccurate recordings.
When recording live generated content, Perfect Loop may have inconsistent results due to the dynamic nature of the live content generation, where the exact same 10 frames may not always be generated.
Effects
Effects in the S-PLAY rely on a gradient, which makes it perfect whether fine-tuning a multitude of single channel dimmers or RGB/RGBW lights in 16 or 8bit variants. To create an Effect, press the green icon and select Effect as the cue type to open the Effect editor window:
- Firstly, provide a cue name to aid identification.
- If you wish to view the output live whilst creating your effect, press the preview button at the top left of the interface to send the data to connected S-PLAY hardware, which outputs to fixtures as defined on the Settings page.
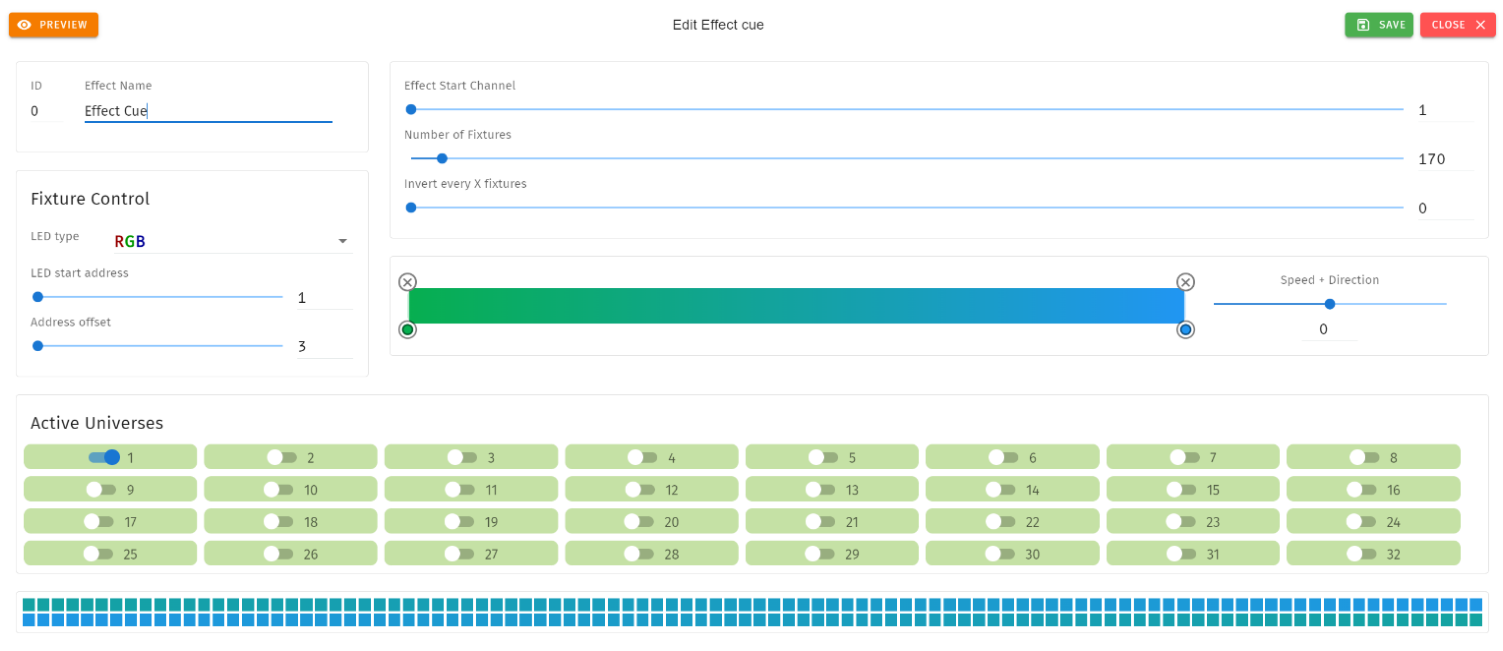
- Next, Fixture Control Tab is where user can define the LED type that the effect will refer to and the LED start address that the first fixture will start on (i.e. the DMX Start address of your first fixture). The Address offset will be populated accordingly, however, you can increase this value to a larger spacing between each fixture.
- The Effect Start Channel defines the position (phase) where the gradient will apply. The Number of Fixtures sets the number of the LEDs which will be included within the effect. By inverting the gradient direction after every defined number of fixtures, the Invert Every X Fixtures allows the creation of a grid of fixtures showing in a non-linear fashion (perfect for pixel tape projects!).
- By clicking on the gradient graphic, the user can modify and define the gradient colour at any point. Each colour point can be dragged to a position to create preferable effect. In order to create for smooth loops, ensure the beginning and end colour of the Effect are the same. The exact range of fixtures that the color point in the gradient graphic will affect can be counted based on Number of Fixtures and Position (%).
- This look can be saved as it is, or a speed and direction can be defined using the slider. (We strongly recommend using the preview option whilst doing this to ensure all is as you expect in the real world).

- Use the toggle switches below the gradient to define the universes that the effect will occupy. This is useful when layering effects or overlapping with other groups. Any universes which are not enabled will be set 0 values on each channel.
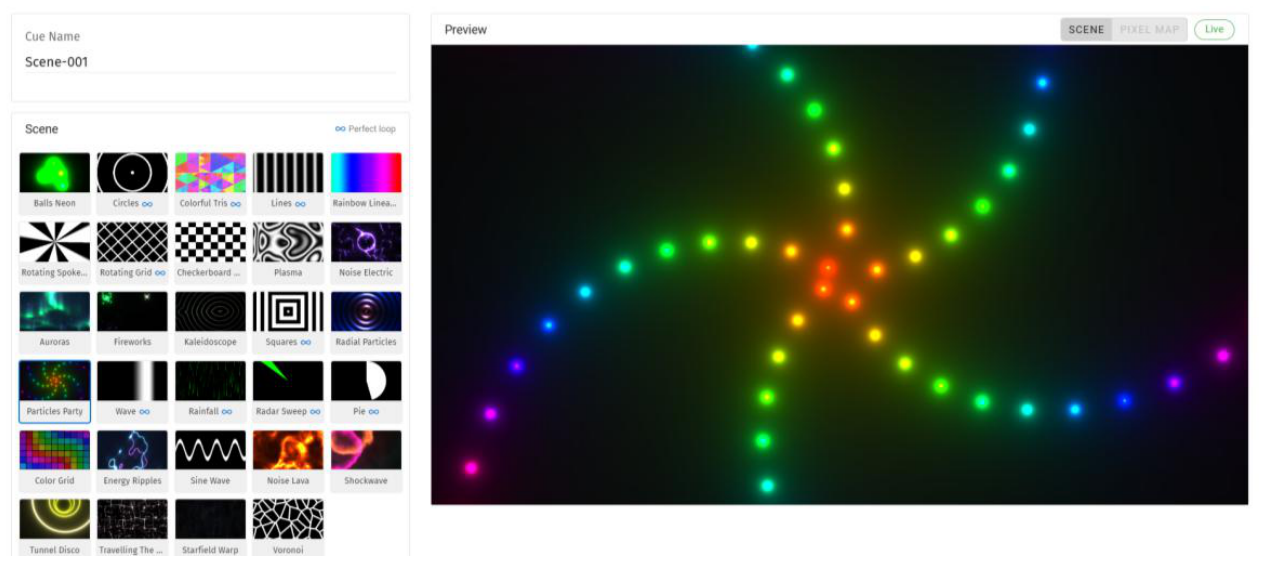
Scene Cue
Scene Cues can ONLY be created in S-PLAY Programmer. This feature does NOT exist on the S-PLAY hardware web interface. Scene Cues are animation-based cues that use shaders and layouts to create complex lighting effects through rendered (baked) animations.
⚠️ Recording Tips: Scene cues require an active layout. Create and configure a layout before trying to add a Scene cue.
Follow the instructions below to create a Scene cue at your preferred methods
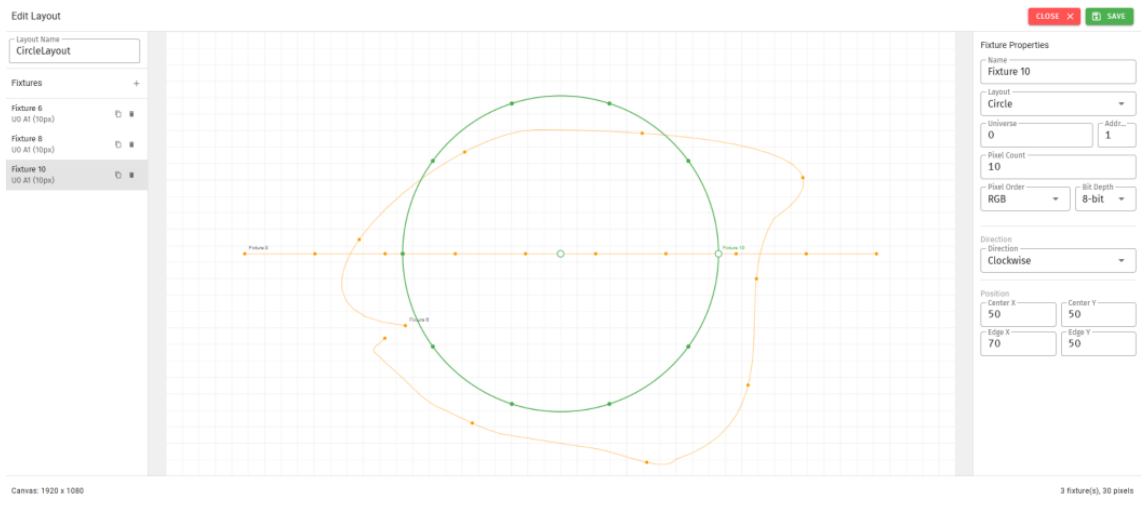
Step 1: Create a Layout
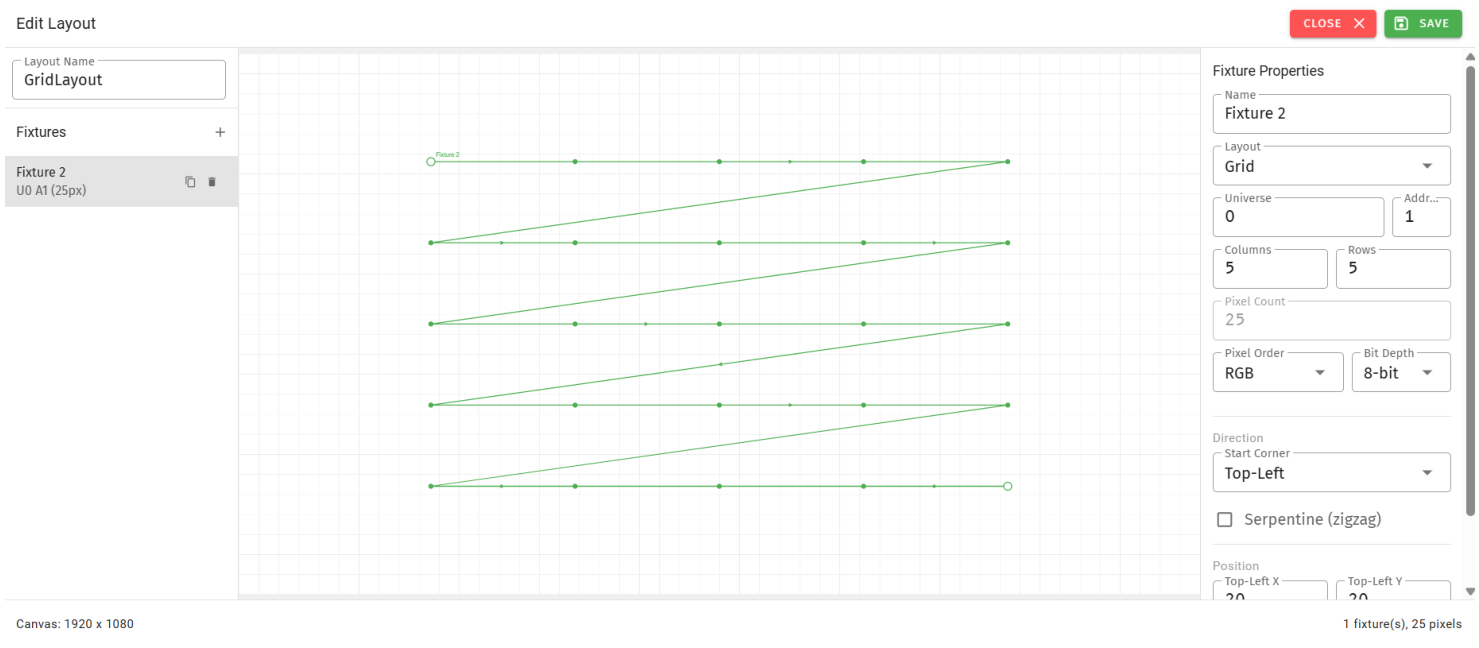
- Navigate to "Layouts" menu.
- Click icon , Start by assigning a name to the cue for easy identification.
- Select one of the following options for data capture:
- Grid
- Linear
- Circle
- Draw
Layout Types
Grid Layout - For matrix arrangements, pixel walls.
- Configure: Columns, Rows, Pixel Order (RGB/RGBW/GRB/BGR/GRBW)
- Set: Bit Depth (8-bit/16-bit), Start Corner, Serpentine (zigzag)
- Pixel Count auto-calculated
Linear Layout - For LED strips, single-row fixtures
- Manual Pixel Count entry
- Direction: Forward or Reverse
Circle Layout - For circular arrangements, rings.
- Manual Pixel Count entry
- Direction: Clockwise or Anti-Clockwise
Draw Layout - For custom shapes, irregular arrangements.
- Manual Pixel Count entry
- Direction: Forward or Reverse
- Use control points to define custom path.
Image showing circle, linear and draw fixtures in single layout
Common Settings (All Types):
- Fixture Name, Universe (1-32), DMX Address
- Pixel Order: RGB, RGBW, GRB, BGR, GRBW
- Bit Depth: 8-bit or 16-bit
- Position: Top-Left X/Y, Bot-Right X/Y (or Control Points for Draw)
- Click "SAVE" to add layout to library.
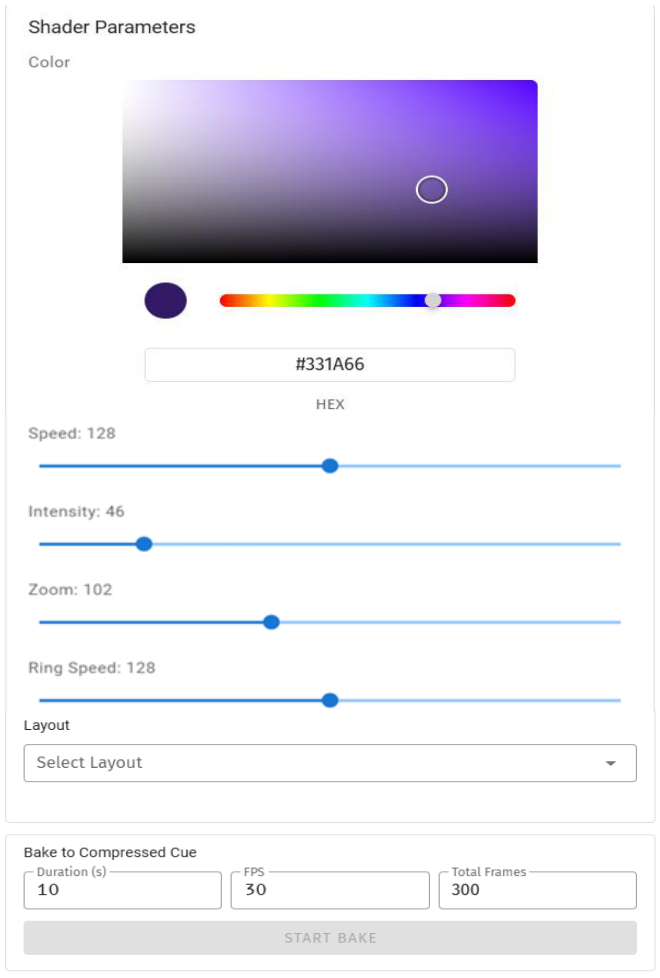
Step 2: Create Scene Cue
- Click the green icon and choose "Scene" as the cue type to open the Dynamic Cue editor window.
- Start by assigning a name to the cue for easy identification.
- Select Layout - Choose saved layout from dropdown.
- Select Shader - Choose animation type (Gradient Sweep, Color Wave, etc.)
- Adjust Parameters - Customize colors, speed, pattern controls.
- Set Bake Time - Enter duration (format: seconds)
- Set Frame Rate - Choose rendering FPS:
- 20 FPS - Smallest file size
- 30 FPS - Balanced
- 40 FPS - Recommended
- 60 FPS - Ultra-smooth
- Click "BAKE" - Rendering process begins with progress bar.
- Preview (optional) - Connect to S-PLAY and click "Preview" to test animation on hardware.
- Click "SAVE" - Cue added to library, ready for playlist use or deployment.
Bake vs Traditional Recording
| Method | Recording Time |
|---|---|
| Dynamic Cue (Recording) | Must wait full duration while recording (e.g., 1 hour content = wait 1 hour) |
| Scene Cue (Bake) | Renders in seconds regardless of duration (e.g., 1 hour content = renders in ~1 minute) |
⚠️ Recording Tips: During Art-Net or sACN recording, when utilizing the 'live preview' function, it is crucial to ensure that no other active Art-Net/sACN device is outputting on the same universes that are being recorded (including the S-PLAY itself). This precaution eliminates the possibility of interference loopback, which can result in erratic or inaccurate recordings. To adjust the output settings of your S-PLAY, navigate to the Settings page.
When recording live generated content, Perfect Loop may have inconsistent results due to the dynamic nature of the live content generation, where the exact same 10 frames may not always be generated.
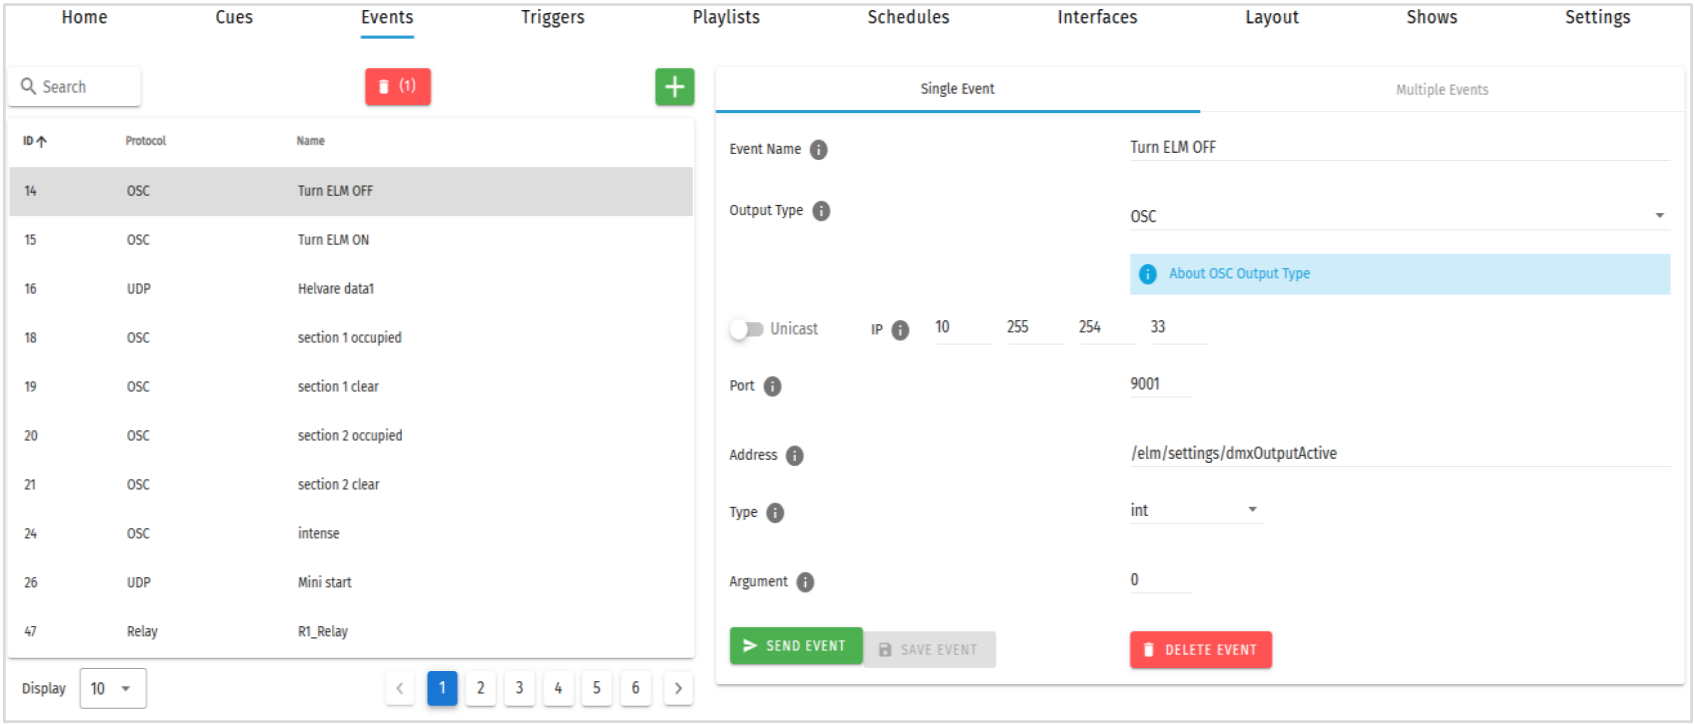
Events
The Events page allows:
- Create 200 custom Events, ready to be embedded in playlists.
- Send Events through: Relay, UDP, OSC, RS232, DMX, Art-Net and sACN.
- Editing, testing and deletion of Events.
Use events to allow integration between S-PLAY and other devices. The S-PLAY can send commands over multiple protocols and interact with relays.
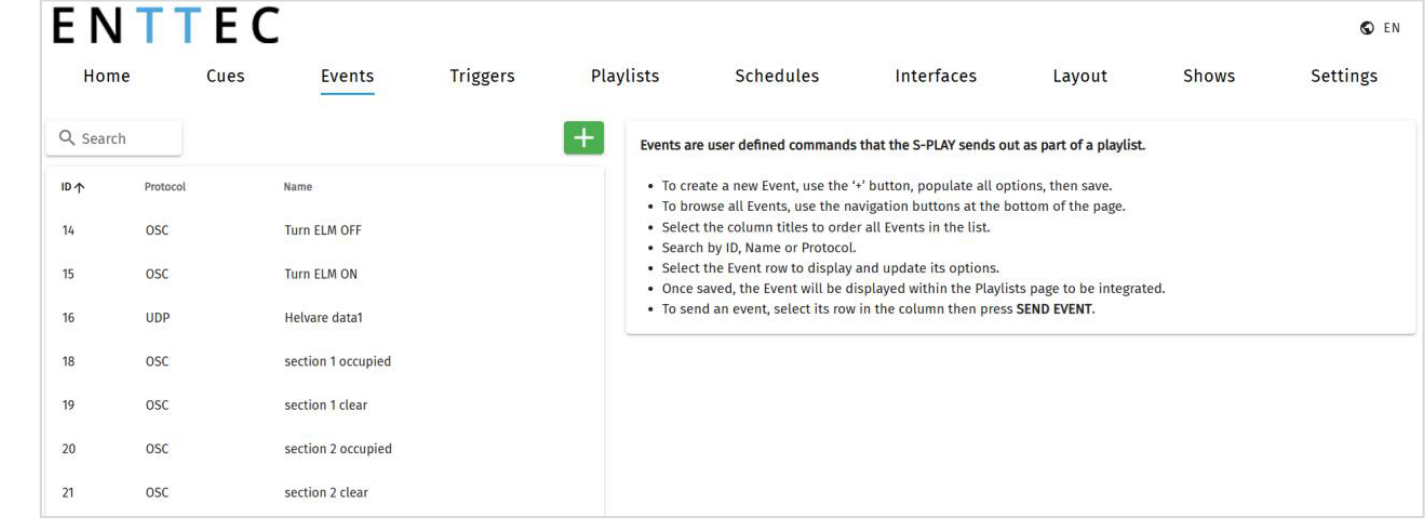
Users can create a single event or use the ‘Multiple Events’ tab to efficiently configure multiple events in a single operation. Insert ‘ADD NUMBER{}’ in the event name to automatically generate identifiers.
RS232
- An RS232 Event will send the user defined RS232 command, when activated.
- RS232 strings ending in \r – the \r will be replaced by a carriage return.
- RS232 strings ending in \n – the \n will be replaced by a line feed.
Make sure the receiver has the correct communication setup:
- Baud rate: 9600
- Data: 8bit
- Parity: None
- Stop: 1bit
- Flow Control: none
⚠️ Note: ASCII Command text limited to 1024 Characters.
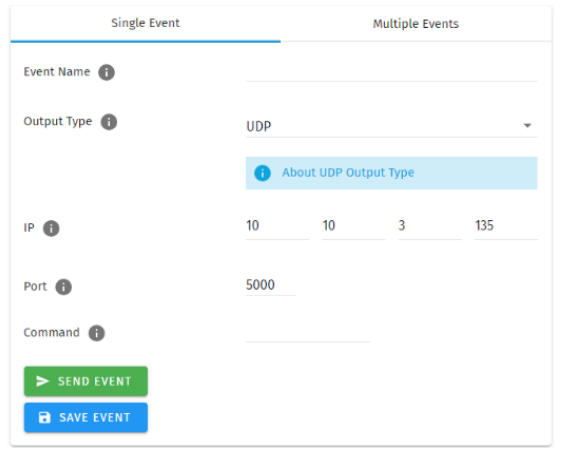
UDP
- A UDP Event will send the command defined below when activated.
- Commands are limited to 1024 characters.
- UDP strings ending in \r – the \r will be replaced by a carriage return.
- UDP strings ending in \n – the \n will be replaced by a line feed.
- Internal UDP event can be sent by setting IP to 127.0.0.1 and Port to 5000 (or Network Settings - UDP input port).
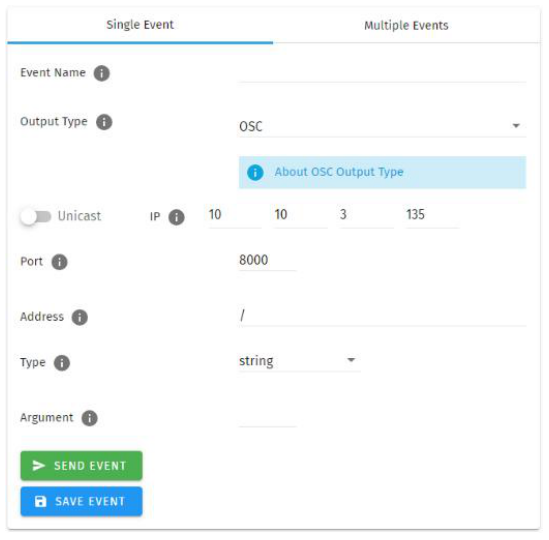
OSC
- When activated, this Event will send the OSC data defined in the settings.
- OSC Strings, Floats and Integers can be defined.
- All OSC addresses must start with a leading ‘/’ sign.
Relay
- Control the relay action. When activated in a playlist the Relay will perform the selected action:
- NO: Normally Open
- NC: Normally Closed
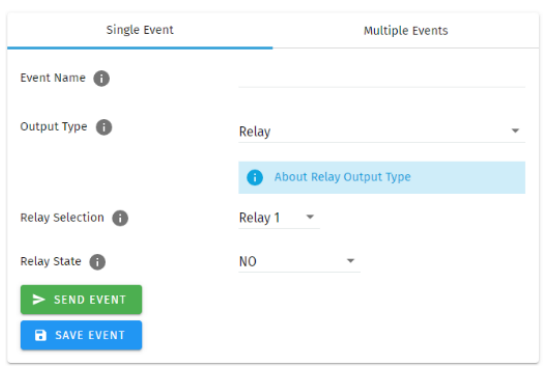
⚠️ Note: On system power-up, the Relays position is set to be normally open.
Art-Net
- When activated, this Event will send the Art-Net frame with channel state defined in the settings.
- For best practice, do not overlap Events with universes used for playback of recordings.

sACN
When activated, this Event will send the sACN frame with channel state defined in the settings.
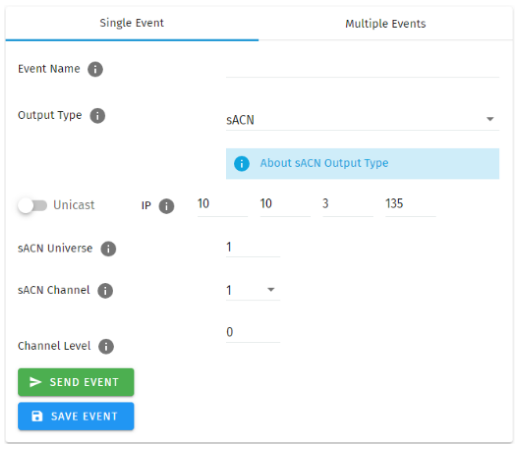
- For best practice, do not overlap Events with universes used for playback of recordings.
DMX
When activated, this Event will send the DMX frame with channel state defined in the settings.
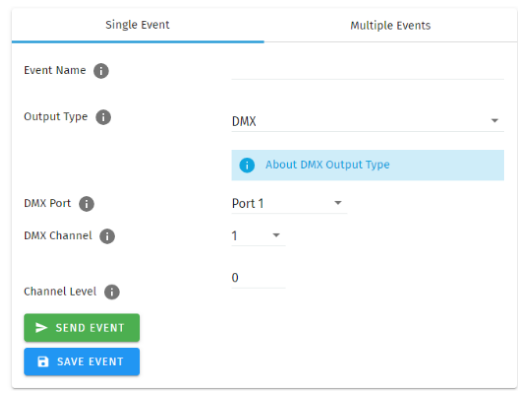
- For best practice, do not overlap Events with universes used for playback of recordings.
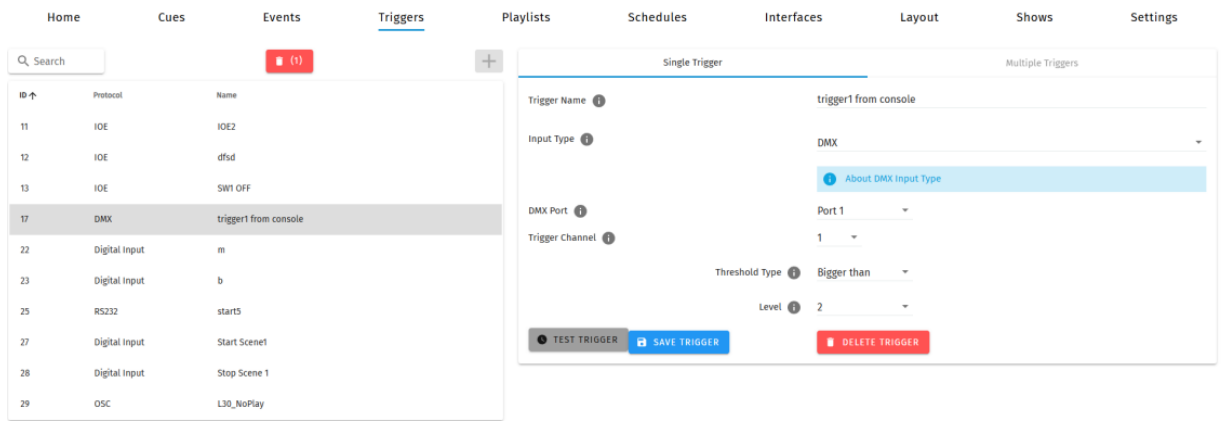
Triggers
The Triggers page allows:
- Create 200 custom Triggers, ready to be embedded in playlists.
- Set receiving triggers from: Digital input, UDP, OSC, RS232, DMX, Art-Net and sACN.
- Editing, testing and deletion of Triggers.
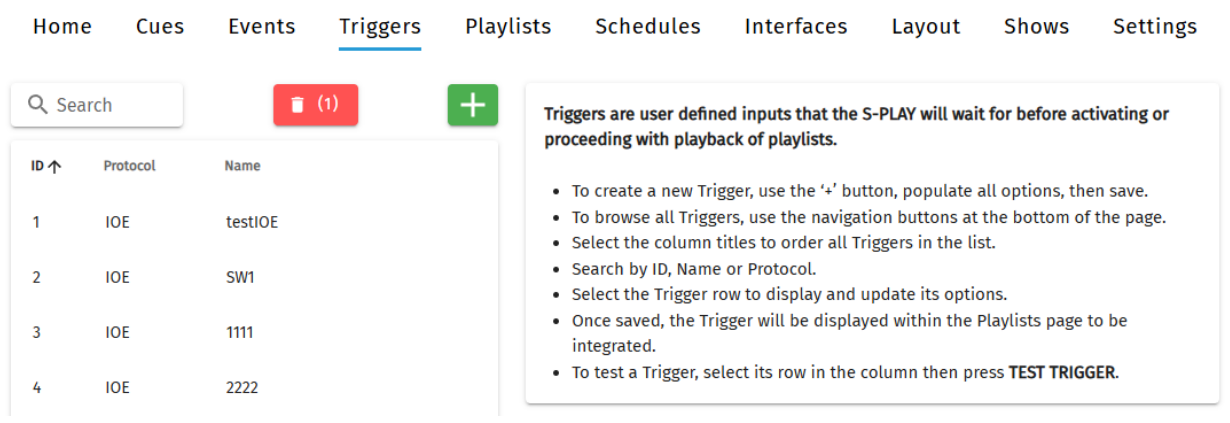
Use triggers to take control of the timeline of the playlist. When using a trigger, the timeline will pause until the selected trigger is active.
Triggers can be used to start a playlist or at any point within the timeline.
When a playlist is awaiting a trigger, it can be played either by activating the trigger or by pressing the play button, ensuring complete control over playback even when triggers are unavailable.
When creating new triggers, the ‘Test Trigger’ option can be used to send the trigger being created.
Users can create a single trigger or use the ‘Multiple Triggers’ tab to efficiently configure multiple triggers in a single operation. Insert ‘ADD NUMBER{}’ in the trigger name to automatically generate identifiers.
RS232
RS232 communication settings:
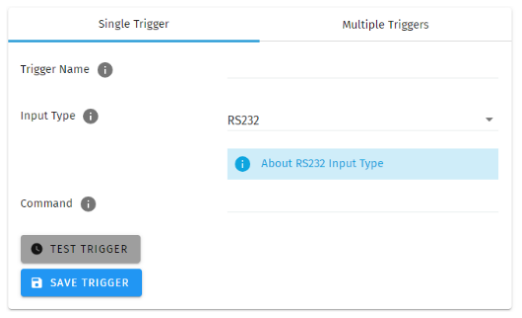
- Baud Rate: 9600
- Data: 8bits
- Parity: none
- Stop: 1bit
- Flow Control: None
- \r at the end of a string will be handled as a carriage return (no need to be included in the string).
- \l at the end of a string will be handled as a line feed, (no need to be included in the string).
⚠️ Note: Each command string is limited to 1024 Characters.
UDP
UDP communication settings:
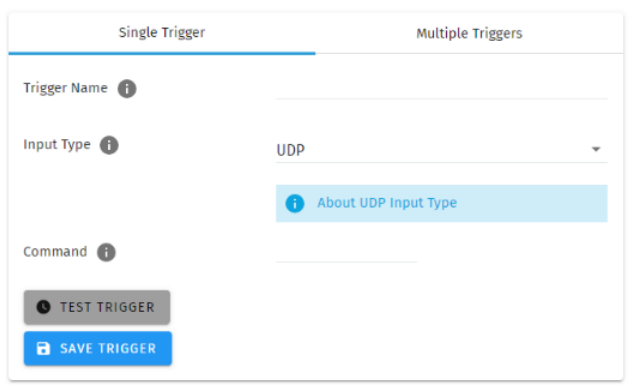
- A Trigger will be activated when an incoming UDP command matches the one defined below.
- To define a UDP input port navigate to your S-PLAY’s Network Settings.
- UDP strings ending in: \r – the \r will be replaced by a carriage return. \n – the \n will be replaced by a line feed.
OSC
The S-PLAY can receive OSC messages through two primary methods:

- Triggers: Users can create triggers to initiate and resume playlists using the OSC communication settings. Key points regarding triggers include:
- Activation of a trigger occurs when an incoming command aligns with the user-defined trigger string.
- Commands must be received on the port specified within the Network Settings, typically set to the default value of 8000.
- All OSC commands must commence with a leading '/' sign.
- Integration with the S-PLAY's OSC API: This integration enables control over various functions, including:
- Master intensity adjustments
- Play, pause, and stop commands for all playlists
- Play, pause, and stop commands for individual playlists
- Intensity control on a per-playlist basis
For further information and to access the OSC API, please visit www.enttec.com.
Digital Input
Use digital inputs with sensors, pressure pads, and wall switches to create an interactive installation.
S-PLAY has 4 digital input ports to activate triggers.
- Idle position for digitals input is high.
- A Trigger is registered when the circuit is completed (low).
- If the input remains in a low position while the timeline goes over the trigger, the playlist won't pause.
Art-Net
An Art-Net trigger can be unicast or broadcast to the S-PLAY.
- The Trigger will be activated, when the incoming value is equal or greater than the Art-Net channel parameters defined.
- To avoid clashes do not use a universe assigned for Recording/Playback.
- When used in a playlist, the S-PLAY will wait to receive the Trigger below before continuing.
sACN
The Trigger will be activated, when the incoming value is equal or greater to the sACN channel parameters defined.

- To avoid clashes do not use a universe assigned for Recording/Playback.
- When used in a playlist, the S-PLAY will wait to receive the Trigger below before continuing.
DMX
- The Trigger will be activated, when the incoming value is equal or greater to the DMX settings defined.
- To avoid clashes do not use a universe assigned for Recording/Playback.
- When used in a playlist, the S-PLAY will wait to receive the Trigger below before continuing.
⚠️ Note: If DMX is selected as output protocol in the setting page, the DMX triggers will be disabled in the playlist.
Playlists
The Playlists page is where playlists can be created by combining Cues, Events and Triggers onto the timeline. Using the tools made available it is possible to:
- Create 200 playlists
- Play multiple playlists simultaneously.
- Create, Edit, Rename and Delete Playlists.
- Access to all Playlists.
- Play, Pause and Stop Playlists.
- Re-order Playlists.
- Hide certain playlists from the home page.
- Define loops.
- Define fade time.
- Define start and stop triggers or to start from start up.
- Set Master intensity.
The playlist editor allows the user to add multiple cues (static, dynamic or effect), events and triggers in a sequence to be stored and played back at any given point.
Top Tip:
By default, cues on the timeline hold their end value on the output until a different scene is triggered. If you want to send a blackout at the end of a specific cue or timeline to all channels, set it to have a fade out time. If you require a snap to black instead of a fade out effect, set this fade out time to be 0.001 second.
Playlists Page Layout
The playlists page is comprised of 9 key elements:
- Control all playlists playback with master level
- Global playlist control
- Search and filter bar for cues, triggers & events
- Cues, triggers & events library
- Cue configuration
- Cues tracks
- Event track
- Trigger track
- Playlist configuration
- Timeline navigation
Created Playlists
This section lists all the playlist created. The section displays basic information like the playlist name and duration and gives basic control over a playlist.

- Reorder: Drag and drop the playlist from the three dots rearranging your playlist (this will be reflected on the Home Page).
- Edit: Loads the playlist in the timeline and media tracks for editing
- Name: Displays the ID (set internally) and name of the playlist set in the Playlist Attribute section.
- Intensity: real-time control of the master intensity of the playlist. By default, it is set to 100% and it can be changed when the playlist is playing.
- Control - Play: Play the selected playlist, also the Playlist is loaded into the timeline and media track section.
- Control - Pause: Pause the selected playlist. By pausing a playlist, S-PLAY holds the last DMX value.
- Control - Stop: Stops the selected playlist. By stopping a playlist, S-PLAY stops outputting any data (set DMX value to 0).
- Status: Shows the status of the playlist. It can be: Playing, Paused, Stopped, Waiting for Trigger.
- Timeline and Duration: Shows the playback state of each playlist. Once the playlist has completed playing, it stops outputting data. Opacity of this bar matches the playlist intensity.
- Delete: Deletes the playlist and schedules where the playlist is used in.
Global Playlist Control
Gives control over all playlists. When pressing play on the global control, all the playlists start playing. If there are conflicts in channels, the values are merged on a Highest Takes Precedence (HTP) basis.
Search and Filter Bar
This box contains all Cues Events and Triggers Stored on the S-PLAY. To create a new Playlist, select "Create New Playlist" from the list. This entry will always be the first entry on the menu.
Cues, Triggers & Events Library
Lists all the media that can be used in the playlist. It is categorised by Static Cues, Dynamic Cues, Effects, Events and Triggers.
To use any media, drag and drop the desired cue into any of the media tracks. Please note that triggers and events have dedicated tracks.
Events and Triggers can also be easily added from the button.
⚠️ Note: To ensure the best output frame rate and performance, it's recommended to avoid using the same dynamic cue in different playlists.
Playlist Playback Configuration

- Playlist Fader Configuration: Set the fade in and fade out time for a playlist. – Fade out time will begin once the stop command is activated over the defined duration.
- Playlist Duration: The total duration for the playlist.
- ID: Update ID of existing playlist.
- Name: Set the name of the playlist.
- Start Trigger: Options to playback this playlist either "On Power Up" or activate it using a list of triggers that are configured on the Triggers page. To utilise this feature, simply select a trigger from the dropdown menu. The playlist will start playing either by pressing the play button or by activating the chosen trigger.
- Stop Trigger: Choose from a list of triggers that are configured on the Triggers page to stop the playlist; the Playlist will stop when the trigger conditions are met.
- Play Count: Determine the number of times that the playlist will play until it stops.
- Internal Priority: When playing multiple playlists, for any conflict between channels, the playlist with higher priority will drive the output. If the playlist has the same priority the channels will merge following HTP (Highest takes precedence) method.
- Group: A group of playlists is a collection of playlists used together with the "Play one active playlist per group" option on the Settings page. This setting enables smooth fading between looks in a fixed area by ensuring that only one playlist from the group is played at a time.
- Hide from Home: Option to show or hide this playlist in Home Page.
- Save: Saves any change on the Playlist. S-PLAY will ask to save any change before playing a Playlist.
Playlist Settings
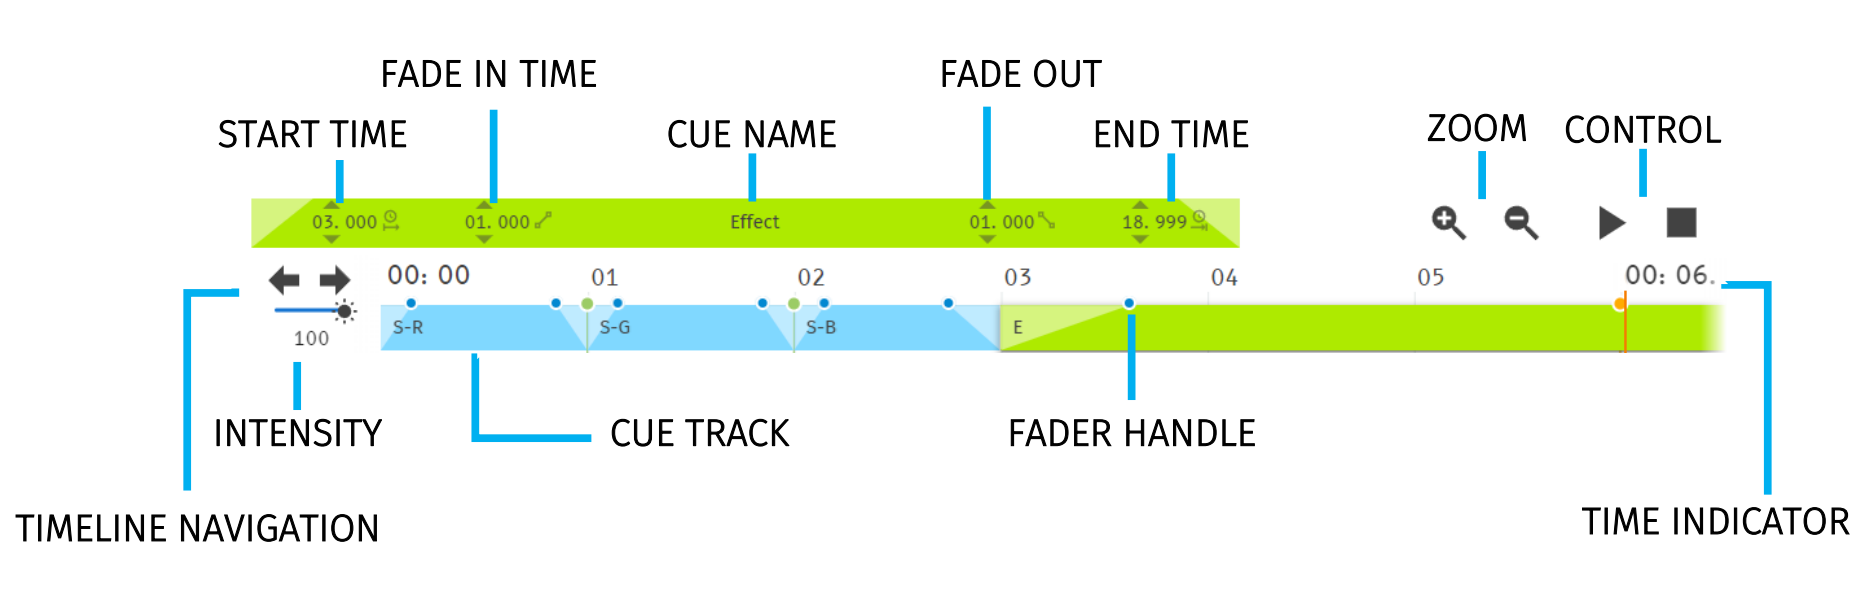
- Cue Fader Configuration: This configures start/end time, fade in/out time for a specific cue added into the cue track. The cue configuration is enabled when a cue in the cue track is selected. Fader handle is also available in the cue track for each cue for intuitive editing.
- Zoom: Zoom In and Out using the magnifying glass with the plus and minus symbol. Note that when you zoom in/out, the values in the timeline change and the size of the cue boxes change.
- Control: Gives navigation and playback over the playlist loaded in the Playlist Editor.
- Timeline Navigation: Navigate back and forward between timelines using this option. Drag the timeline to navigate back and forward.
- Intensity: Each track has its own intensity, and it affects all the media on the same level.
- Cue tracks: Drag and drop media to this section. To remove a cue from the tracks, select the cue and click on the red x next to the right edge of the box. When playing multiple media at the same time. i.e. 2 cues on 2 different tracks, S-PLAY will use HTP (Highest value Takes Priority) merging.
- Event and Trigger Tracks: The bottom 2 tracks are specifically designated for events and triggers. The vertical line indicates the precise timing at which the playlist will either pause until the trigger becomes active or execute the event. When triggers are used, the playlist will pause and maintain the last output value. To resume playback, simply activate the selected trigger or press the play button again.
Example Playlist
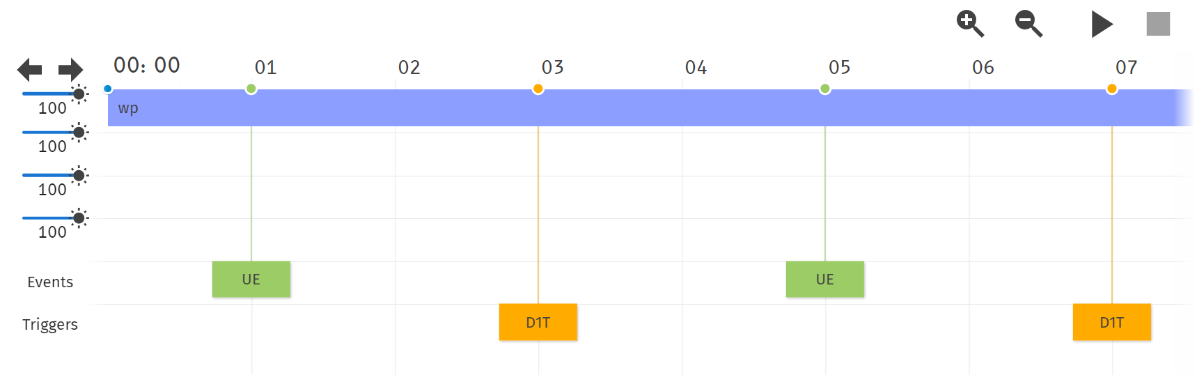
In this example, a playlist named "Playlist 1" is created. It is configured to automatically start playing on power up and will loop indefinitely (Play Count: Infinity).
Within the playlist, there is a dynamic cue labelled "wp" that will play while simultaneously sending a UDP Event (UE). At the 3-second mark, the playlist will pause and wait for a digital input trigger to be received before resuming the playback of the effect, which will continue until the 7-second mark.
The playlist will then proceed to send more Events and wait for triggers as specified. Upon reaching the end of the playlist, it will loop back and replay the sequence.
Schedules
The schedules page allows the user to:
- Access all schedules.
- Create and edit schedules to trigger playlists once or at regular intervals.
- Play and pause schedules.
- Monitor status of the schedule.
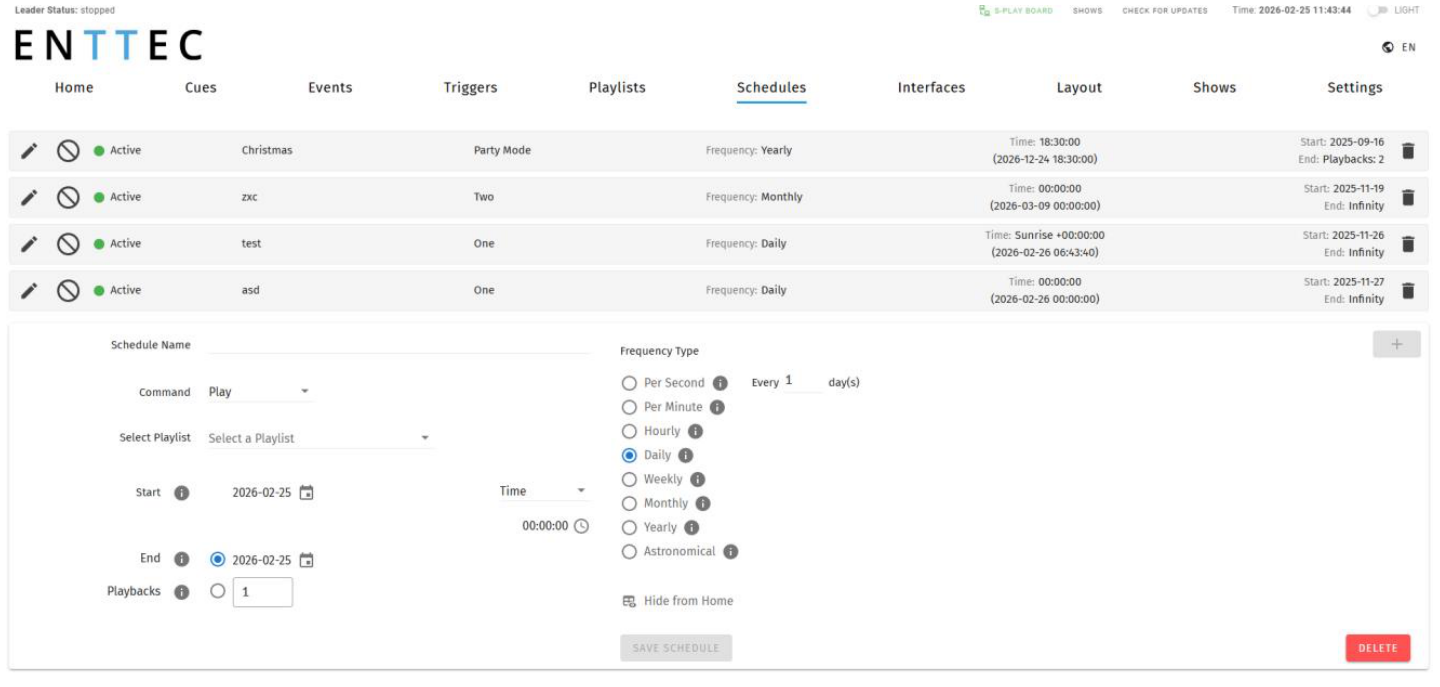
To set up a schedule you need to create a playlist first. S-PLAY allows users to set a schedule for the playlists to play, pause or stop at any time range. Set multiple schedules populating the times to activate and deactivate the playlists.
For example, the first schedule shows “Noise Flow” can be played every day 30 minutes before sunset from the 1st of November until the 31st of December.
The second schedule in the S-PLAY will ‘Stop All’ playlists 30 minutes after sunrise each day for 30 playbacks.

⚠️ Note: Always ensure your S-PLAY system time and location is set correctly in Settings when using Schedules.
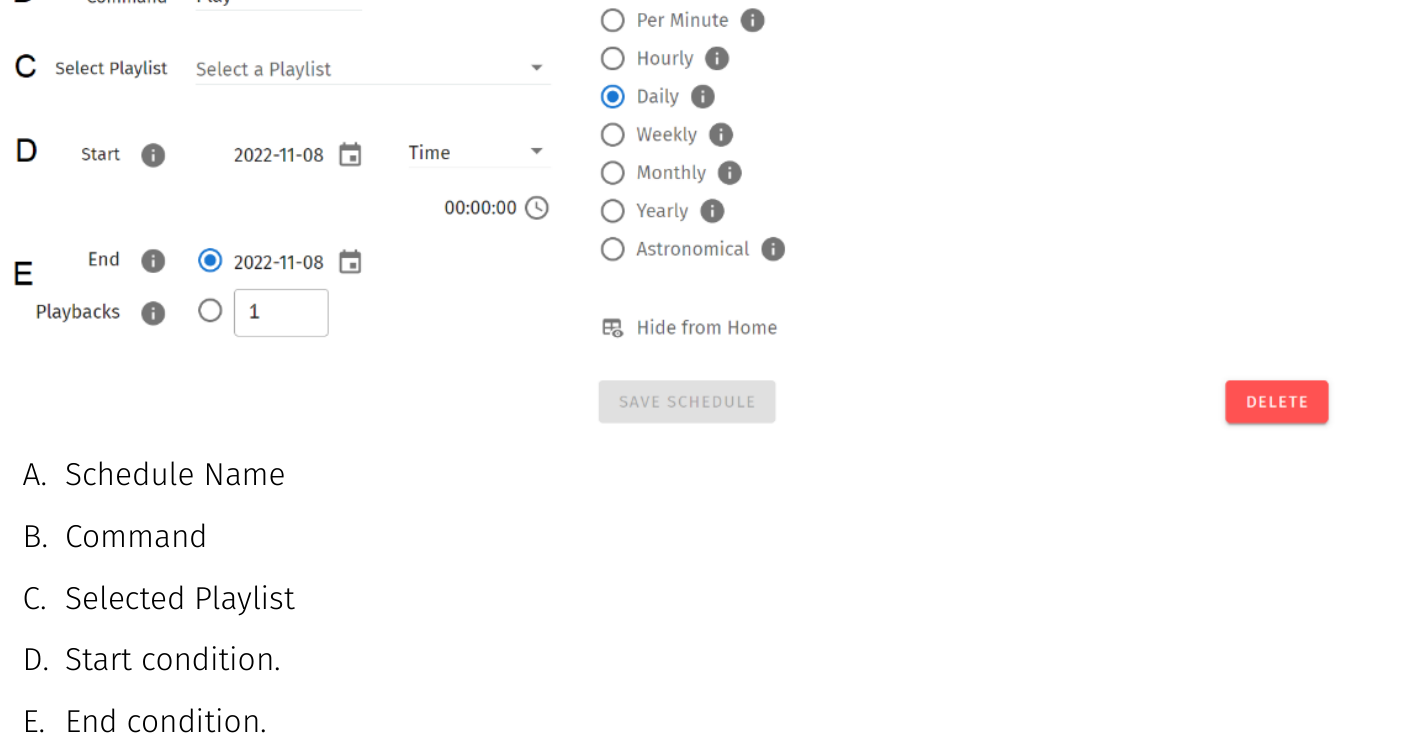
There are 7 different sections to be filled out when creating a schedule:
- Schedule Name
- Command
- Selected Playlist
- Start condition.
- End condition.
- Frequency type.
Created Schedules

The created schedule list gives information briefly of the parameters set on each schedule.
Edit: Load Schedule into the Schedule Editor using the pencil icon to update or change any parameter.
Suspend: Gives control over the scheduler. If a scheduler is suspended, it will not run and the status indicator will become yellow. (Essentially a method to pause the schedule from activating).
Status: Displays the status of the schedule.
- Green: Active Schedule. An active schedule still has instances to play.
- Yellow: Suspended Schedule. The schedule will not play until it's restored to active and the end condition is not met.
- Red: Expired Schedule. An expired schedule does not have any instances left to play.
Schedule name: Name set in the Schedule Editor.
Playlist name: Playlist selected in the Schedule Editor.
Frequency: Play Count is set in the schedule editor, by default this is the same value configured in the playlist attributes.
Time: Set Start time of a day with (next Schedule activation time) below.
Start time: Time set in the Schedule Editor.
Start date: Start date set in the Schedule Editor.
Delete: Delete selected schedule.
Schedule Name
Name to aid Schedule identification.
Select Playlist
List of available Playlists to apply schedule actions to.
Start Condition
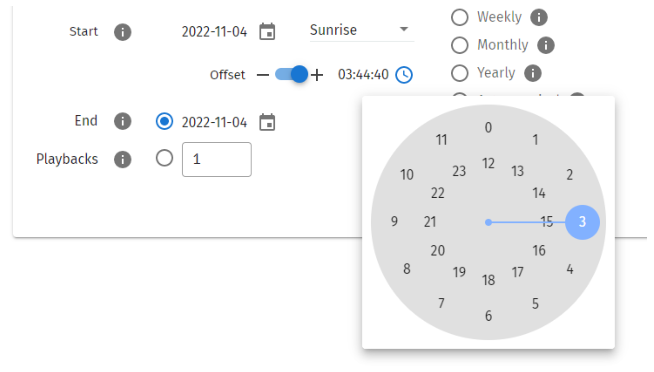
Set a schedule to start at a specific time, at sunrise or sunset. The sun phase is calculated based on the location set in the settings page. It takes into consideration:
- GMT Offset.
- Latitude.
- Longitude.
To set the start of the scheduler to a specific time do the following:
- Select “Time” from the dropdown menu.
- Click the first two digits on the second dropdown menu and set the hour using the dial. Note that the inner circle shows hours past noon (>12) and the outer circle show hours before noon (1AM to 12).
- To set minutes, click on the last two digits and use the dial to select the desired time.
End Condition
The scheduler will expire once the end condition is met. It can be on a specific date or after a desired number of play counts.
Frequency Type
Set the frequency when the playlist set will play:
Per Second: Start the selected playlist after the specified seconds.
Per Minute: Start the selected playlist after the specified minutes.
Hourly: Start the selected playlist after the specified hours.
Daily: Start the selected playlist either every day or number of days.
Weekly: The selected playlist will play on the selected days every week, or as specified in the tick box selection.
Monthly: The selected playlist will play on a specific day of every month.
Yearly: The selected playlist will play on a specific day of the year.
Astronomical: The selected playlist will play depending on the phase of the moon: New Moon – First Quarter – Full Moon – Third Quarter.
Hide from Home
By default, all schedules are shown on the S-PLAY home page. Using the ‘Hide from Home’ option removes them from the homepage. This means users who are not logged in cannot see them.
Interfaces
The Interfaces page in S-PLAY supports 20 custom user interfaces for intuitive and tailored playlist control for end users. The interface can be viewed from any device with a web-browser (i.e. a computer or smartphone) when connected to the same local network and even configured to be a default landing page.
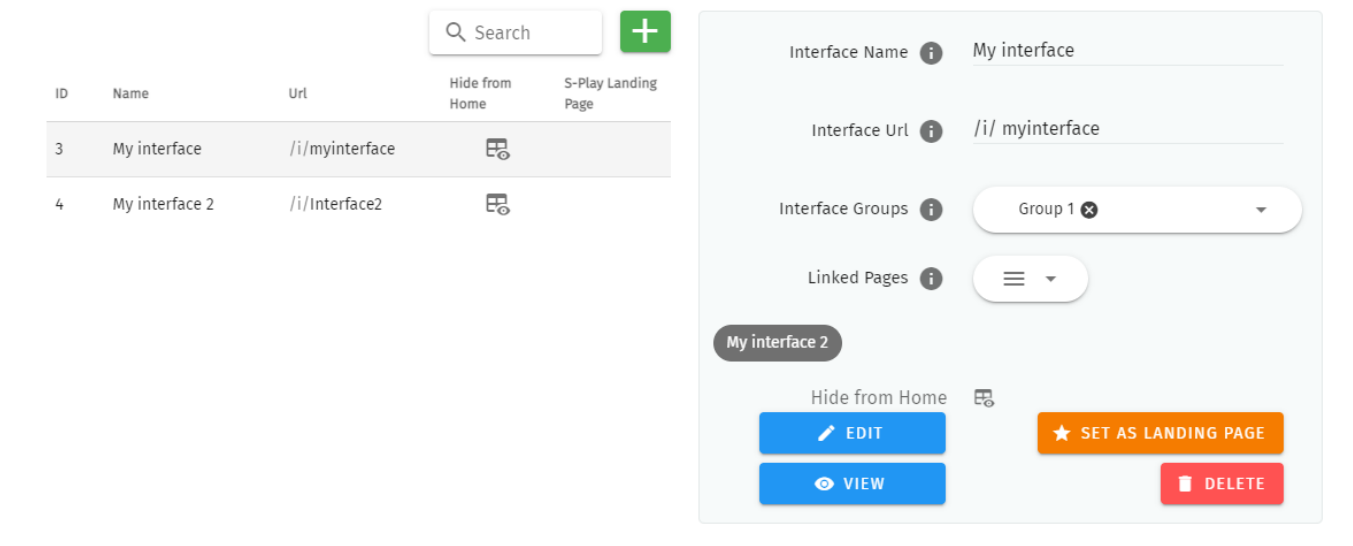
The Interface page features the following options:
- Naming (to be displayed at the top of the interface)
- Configuration of a custom Interface URL.
- The ability to add an interface to an Interface Group to make navigation between interfaces simple.
- Link to specific interface pages. (Drag and drop within the UI to order these pages).
- On the S-PLAY home page, there is a link displayed for accessing the Interface. By clicking on the "Hide from Home" option, the interface will no longer be visible on the home page.
- Set one interface as the S-PLAY’s landing page when connecting to the device IP.
Interface Editor
After an interface has been created, press on the ‘Edit’ button on the interface page to begin adding Widgets and customizing its appearance.
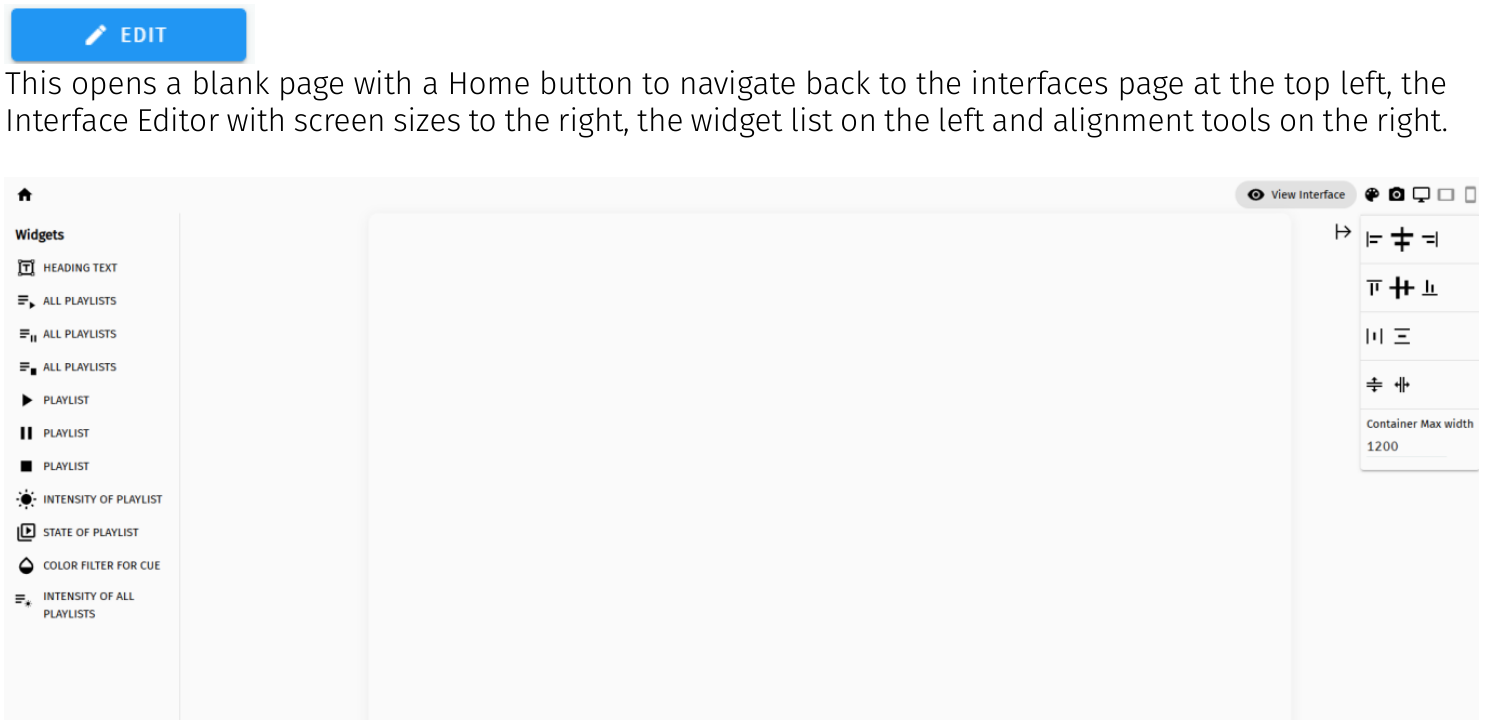
This opens a blank page with a Home button to navigate back to the interfaces page at the top left, the Interface Editor with screen sizes to the right, the widget list on the left and alignment tools on the right.
The interface editor allows interface colour, one background image and individual widgets to be added to the interface. Functions as below table:
| Icon | Item | Function |
|---|---|---|
| Toggle edit mode | Toggle edit mode ON and OFF, this is useful for viewing the interface without individual widget editing to get a feel for how it will look when in use. | |
| Page Colour | Selecting this will open the page colour picker allowing you to select a colour with the colour picker or enter values directly in RGBA or HEX formats. | |
| Add/Remove Background Image | Adds or removes a background image to the canvas (image size limit is 700KB). | |
| Desktop, Tablet, Mobile screen sizes | Changes canvas view to Desktop, Tablet and Mobile screen sizes when clicked to view/edit the widgets. | |
| Alignment Horizontal | Set all controls to Left, Centred or Right. (Default centred). | |
| Alignment Vertical | Set all controls to Top, Centred or Right. (Default centred). | |
| Distribute Spacing | When multiple widgets are selected, this will arrange them so that the space in between each object is equal vertically or horizontally. | |
| Make Same Height/Width | When multiple widgets are selected, the first widget will be used to alter the other widgets' height/width to match the first one clicked. | |
| Container Max Width | Sets the max container width on Desktop view so that users can control the exact size to match their background images. |
After the background is set, user can add widgets to design the interface.
Widgets
Widgets are the building blocks of buttons or sliders that can be:
- edited for its display name.
- set a quick functional command.
- set the playlist from the created playlists.
- Displayed in circle or rectangle shape.
- displayed in customised width.
- displayed in customised colour through RGBA colour picker.

Each widget function as below table:
| Widget | Function |
|---|---|
| Widget to add text to the canvas. | |
| Widgets to control all Playlists contained on the S-PLAY. | |
| Widgets to control all Playlists contained on the S-PLAY. | |
| Widgets to control all Playlists contained on the S-PLAY. | |
| Widgets to control Specific commands on the S-PLAY Playlists contained on the S-PLAY. | |
| Widgets to control Specific commands on the S-PLAY Playlists contained on the S-PLAY. | |
| Widgets to control Specific commands on the S-PLAY Playlists contained on the S-PLAY. | |
| Widgets featuring a slider to control intensity for all playlists or individual playlist. | |
| Widgets featuring a slider to control intensity for all playlists or individual playlist. | |
| Widget to control Play/Stop commands for given Playlist. This button also shows the playlist’s state and playback progress. | |
| Widget to control colour filter of a specific Effect Cue. |
Arranging Widgets on the Canvas
Once a widget has been added to the canvas, it can be customised to suit the interface layout:
- Drag the widget freely to position it as desired.
- Resize the widget horizontally or vertically using the adjustment handles according to your needs.
- Use the alignment tools to ensure widgets are precisely aligned for a clean, organised interface.
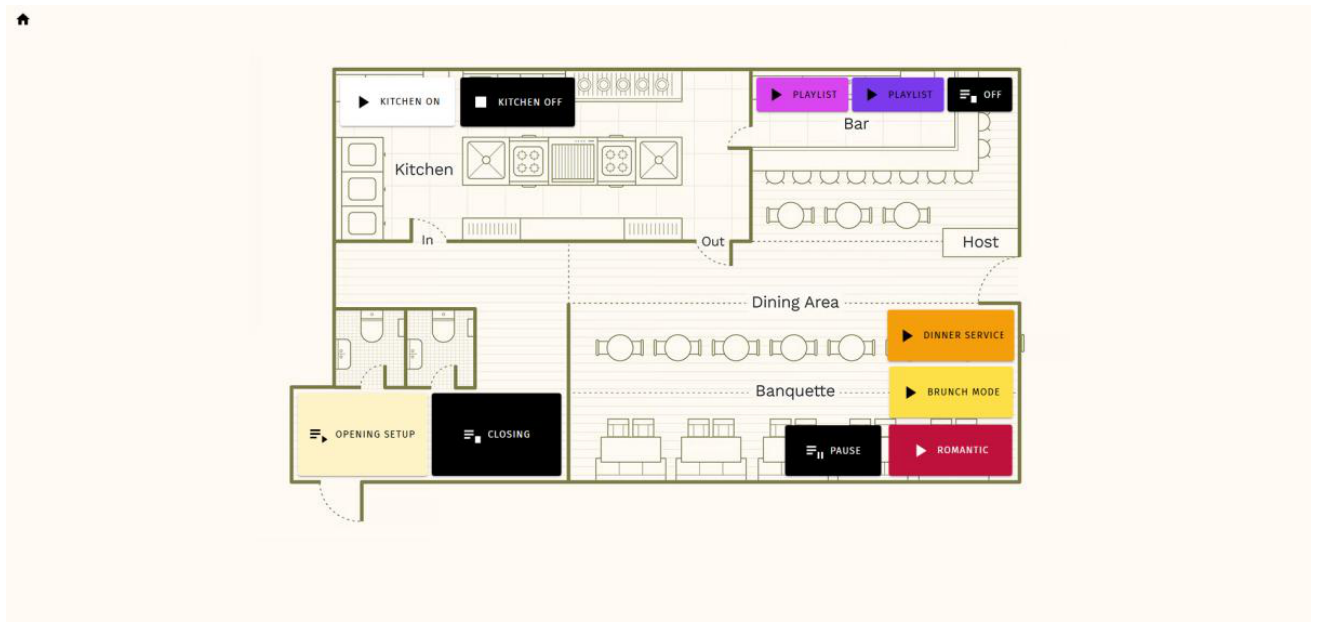
Example interface
Shows
- A Show is a complete project containing all cues, playlists, schedules, events, triggers, and interfaces.
New Show
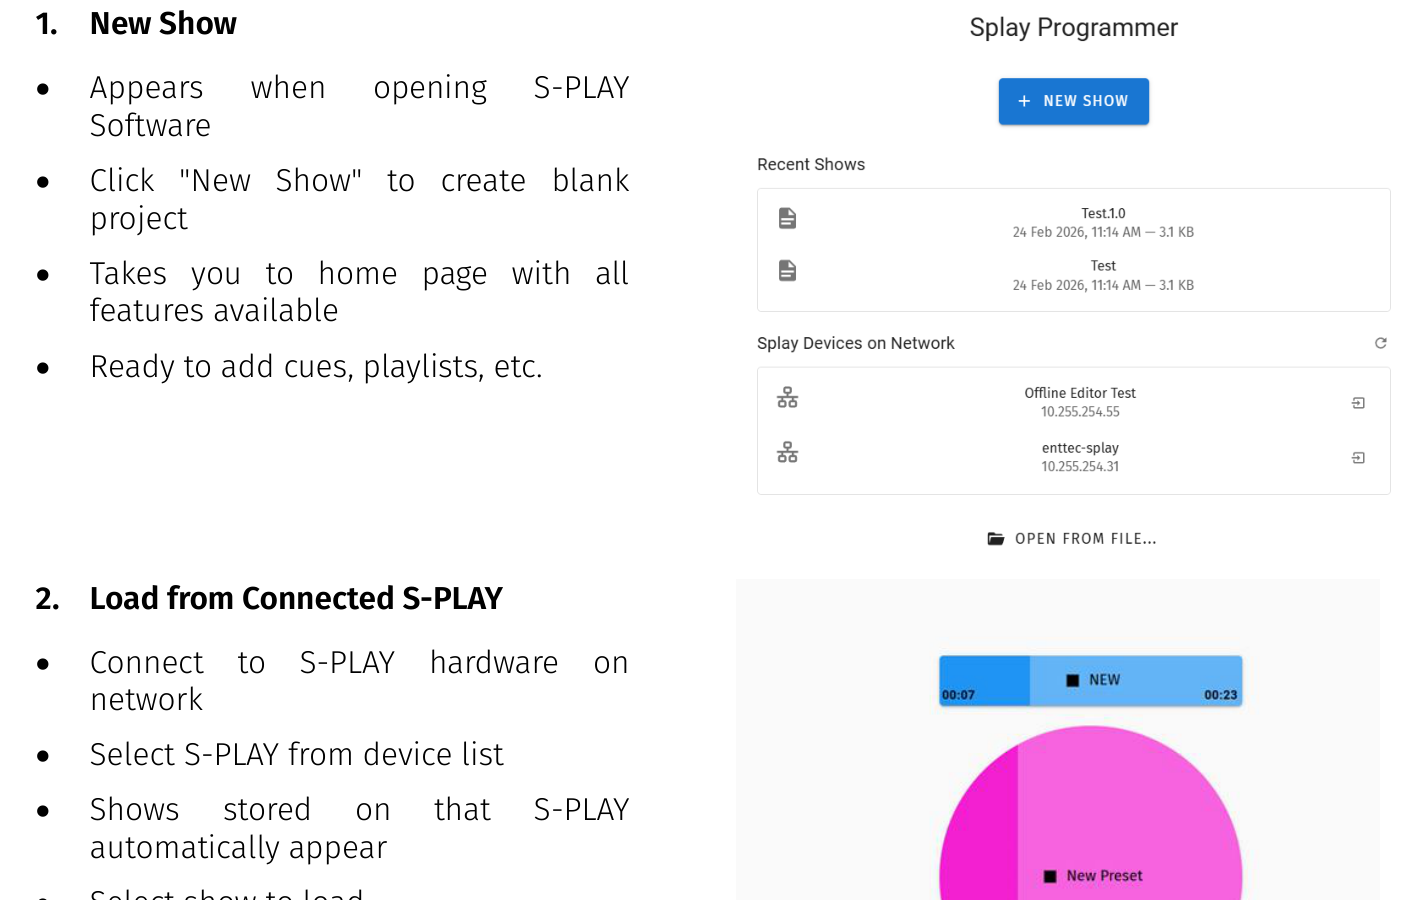
- Appears when opening S-PLAY Software
- Click "New Show" to create blank project
- Takes you to home page with all features available
- Ready to add cues, playlists, etc.
Load from Connected S-PLAY
- Connect to S-PLAY hardware on network
- Select S-PLAY from device list
- Shows stored on that S-PLAY automatically appear
- Select show to load
- Show extracts and opens in software
- Shows from connected S-PLAY load automatically - no manual extract needed.
Save and Save As
The Save to Connected S-PLAY:
- File Menu → Save
- Saves show to currently connected S-PLAY hardware
- Save to Computer:
- File Menu → Save As
- Enter show name
- Choose location on computer
- Show saved locally as file
Export For hardware
Create portable .bak file for offline upload:
- File Menu → Export for Hardware
- Generates .bak file
- Manually upload to S-PLAY later via S-PLAY web interface
Use when: S-PLAY not on network, pre-programming, or creating files for shipment.
Open from Files
Load show from computer
- File Menu → Open
- Browse to show file location
- Select .bak or show file
- Show loads into software
Edit and Re-Deploy
- Extract show from S-PLAY
- Edit in software
- Preview changes (if S-PLAY still connected)
- Save modified show
- Deploy updated show back to S-PLAY
Settings
Fast navigation between each option tab can be made using the navigation menu on the left-hand side of the page.
⚠️ Note: These settings configure the connected S-PLAY hardware's outputs. The software itself does not output DMX.
The Settings page configures the connected S-PLAY hardware device, not the software itself. Changes made here apply to the S-PLAY hardware and are saved to the device.
The settings page allows the user to:
- Set a unique S-PLAY device name for identification on the network
- Configure Art-Net and sACN settings and the corresponding IP.
- Configure refresh rate.
- Change the S-PLAY’s network configuration.
- Define the OSC and UDP input port.
- Set the date, time and location.
- Update playback configuration.
- Send black frame on playlist stop.
- Restrict playback of one playback group at a time.
- Update Software.
- Reset to factory defaults.
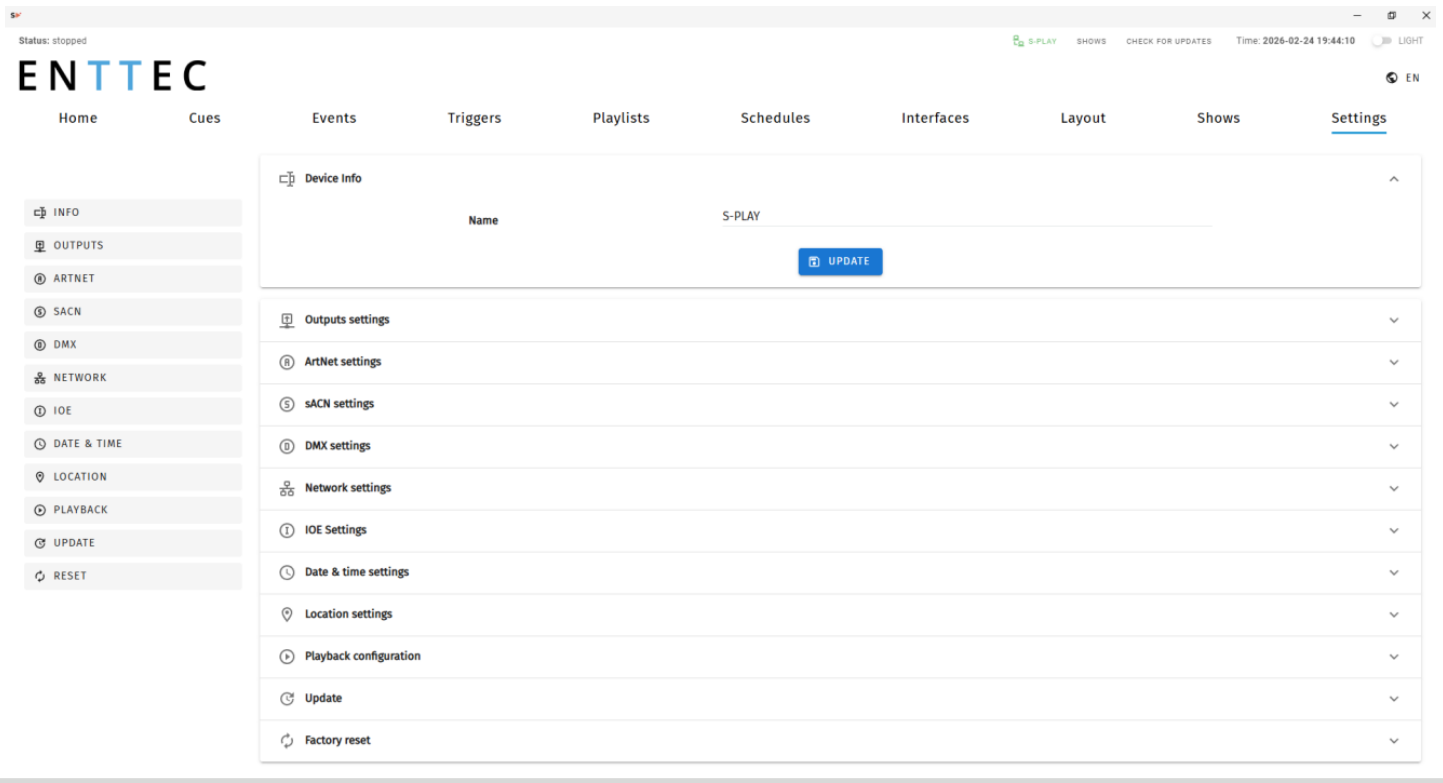
Device Info
Device info allows user to set unique S-PLAY name for identification. This will then be shown on LCD and becomes the hostname. Uptime shows the time the S-PLAY has been working.
Output Settings
The Output Settings allows you to assign S-PLAY’s internal 32 universes data to the Art-Net, sACN and DMX with settings configurable in the next section to create tailored outputs required for your project.
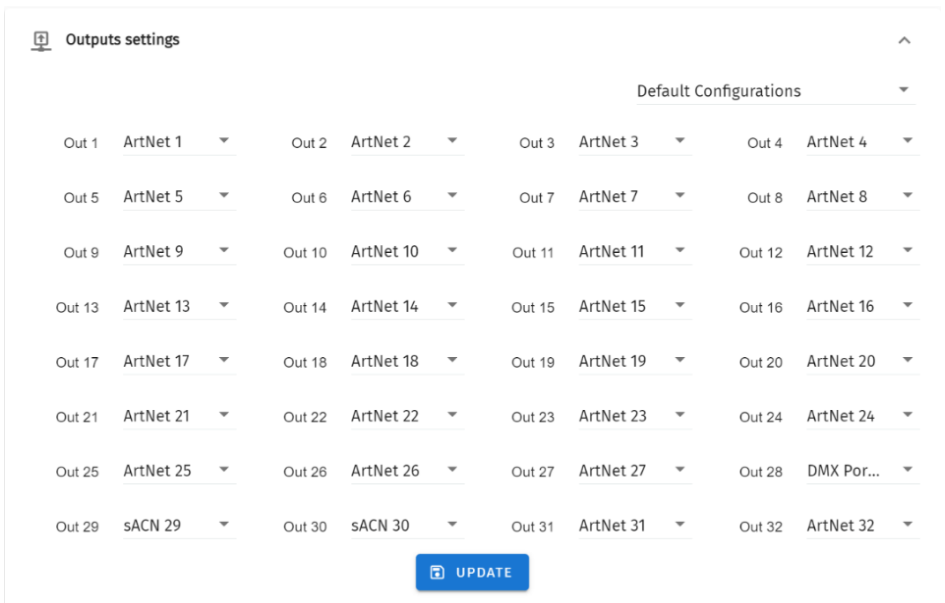
Drop-down in the upper right corner allows to set all outputs to one protocol with one click.
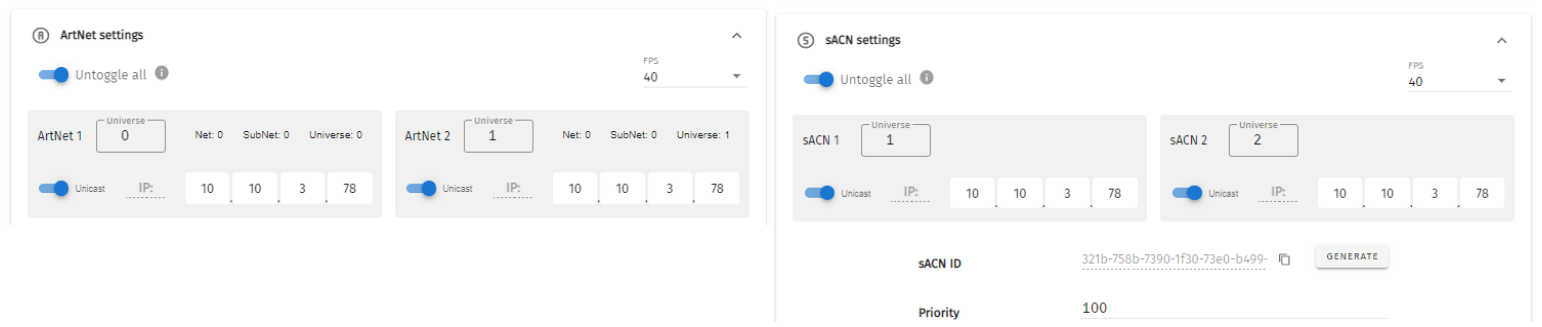
Art-Net and sACN Settings
Art-Net and sACN settings allow configuration to each internal 32 Universes directed to the S-PLAY. This section allows a universe to be set to unicast, multicast & broadcast alongside the refresh rate between 1 to 60 FPS.
The sACN ID can be regenerated, and the Priority can be set between 1 and 200, with a default value of 100. This Priority value is also applied to sACN Events.
Top Tip: The tab key on your keyboard can be utilised to expedite the editing process when entering Universe numbers and IP addresses for sACN and Art-Net configurations.
DMX Settings
Provides control over DMX output frame rate.
Network Settings
Network Settings allow a DHCP or Manual IP address to be defined. Once update IP changes, the S-PLAY will reboot to start all services.
UDP and OSC input ports for use with S-PLAY Triggers can also be defined in the Network Settings.
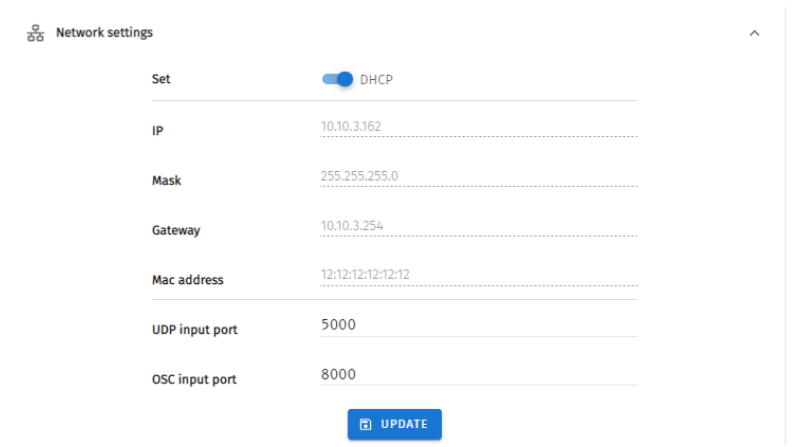
Default Network Settings:
DHCP: Enabled
Fall Back/Static IP: 192.168.0.10
Mask:255.255.255.0
Gateway: 192.168.0.1
Default Ports:
UDP Input Port: 5000
OSC Input Port: 8000
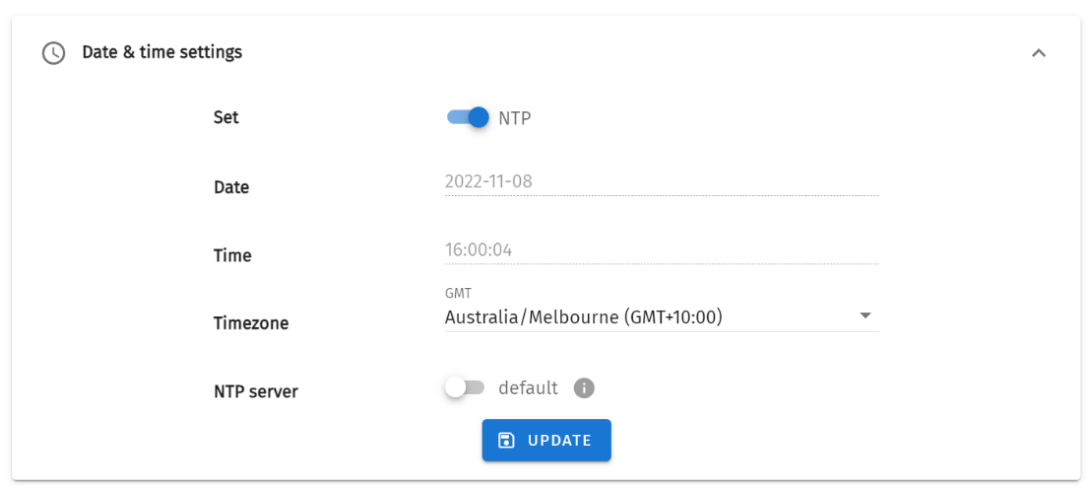
Date & Time Settings
Either define it manually or enable NTP to set the Date and Time from local network automatically. When the time is set manually, it is required to be updated to reflect daylight saving time twice a year.
Location Settings
Latitude and Longitude can be defined to inform the sunrise/sunset times used by the scheduler.
You can find your site’s latitude and longitude using geolocators. An example of one of these is: https://www.latlong.net/
Playback Configuration
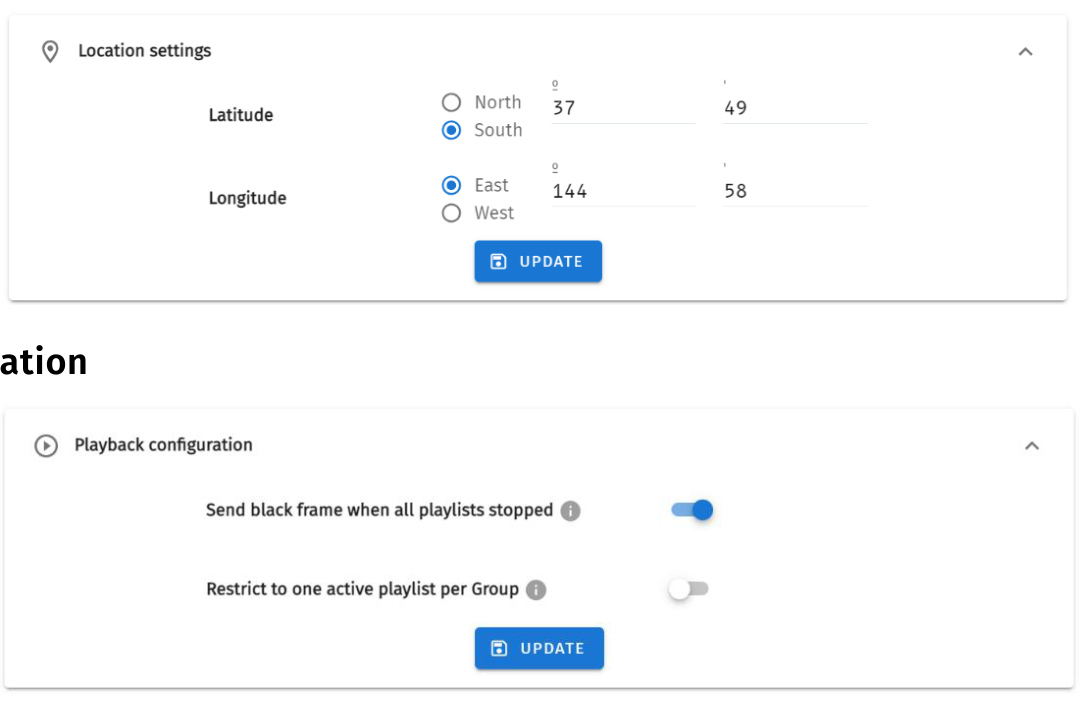
Playback configuration allows global settings to be defined.
The option to restrict to one active playlist per group stops all other playbacks in the group. All stopped playlist will obey their fade times.
Software Update

To update software, click the check for updates button in the header menu or go to Update in the settings menu and check for updates, click for updates.
Factory Reset
To reset from Software Interface, navigate to Reset in Settings page and click the Factory Reset button.

⚠️ Note:
- It's important to note that a factory reset will erase all created content, returning the software to its original factory state.
- Always take a backup before undertaking a factory reset. Factory reset cannot be stopped once initiated.
Revision History
- Manual Version: 1.0
- Document Date: February 2026
- Software Version: V1.0.0
Ordering Information
For further support and to browse ENTTEC’s range of products visit the ENTTEC website.
| Item | Part No. |
|---|---|
| S-PLAY Programmer | 70100 |
| S-PLAY SP1-1 | 70092 |
| S-PLAY LITE | 70094 |
| S-PLAY MINI | 70093 |
| S-PLAY NANO | 70095 |
Due to constant innovation, information within this document is subject to change.